3. 如果在打开安装包后,文件夹显示如下(图标上出现禁止符号),则说明你当前的系统版本与 **ComfyUI 桌面版** 不兼容。
 4. 然后在 **启动台 (Launchpad)** 中找到对应的 **ComfyUI 图标**,点击它即可进入 ComfyUI 的初始化设置。
 ## ComfyUI 桌面版初始化流程
 点击 **Get Started** 开始初始化步骤。
 点击 `All` 可以切换查看可以操作的所有内容
 对应三个选项:
1. **MPS(推荐):** Metal Performance Shaders (MPS) 是苹果的优化框架,让开发者能在苹果设备上利用 GPU 加速包括机器学习在内的高性能计算任务,且支持 PyTorch 等框架使用 GPU 提升模型训练和推理效率。
2. **Manual Configuration(手动配置):** 你需要手动安装和配置 Python 运行环境。除非你知道应该如何配置,否则请不要选择。
3. **Enable CPU Mode(启用 CPU 模式):** 仅适用于开发人员和特殊情况。除非你确定需要使用此模式,否则请不要选择。
如无特殊情况,请按截图所示选择 **MPS**,然后点击 **Next** 进入下一步。
对应三个选项:
1. **MPS(推荐):** Metal Performance Shaders (MPS) 是苹果的优化框架,让开发者能在苹果设备上利用 GPU 加速包括机器学习在内的高性能计算任务,且支持 PyTorch 等框架使用 GPU 提升模型训练和推理效率。
2. **Manual Configuration(手动配置):** 你需要手动安装和配置 Python 运行环境。除非你知道应该如何配置,否则请不要选择。
3. **Enable CPU Mode(启用 CPU 模式):** 仅适用于开发人员和特殊情况。除非你确定需要使用此模式,否则请不要选择。
如无特殊情况,请按截图所示选择 **MPS**,然后点击 **Next** 进入下一步。
 在这一步选择 ComfyUI 以下相关内容的安装位置:
* **Python 环境**
* **Models(模型文件)**
* **Custom Nodes(自定义节点)**
建议:
* 请新建一个单独的空白文件夹作为 ComfyUI 的安装目录。
* 请确保磁盘至少有 **5GB** 左右的可用空间,以保证 **ComfyUI 桌面版** 的正常安装。
在这一步选择 ComfyUI 以下相关内容的安装位置:
* **Python 环境**
* **Models(模型文件)**
* **Custom Nodes(自定义节点)**
建议:
* 请新建一个单独的空白文件夹作为 ComfyUI 的安装目录。
* 请确保磁盘至少有 **5GB** 左右的可用空间,以保证 **ComfyUI 桌面版** 的正常安装。
 在这一步,你可以将已有的 ComfyUI 安装内容迁移到 ComfyUI 桌面版中。选择你电脑上已有的 **ComfyUI** 安装目录,安装程序会自动识别对应目录下的:
* **User Files(用户文件)**
* **Models(模型文件):** 不会进行复制,只是与桌面版进行关联。
* **Custom Nodes(自定义节点):** 节点将会重新进行安装。
不用担心,此步骤不会复制模型文件。你可以按需勾选或取消勾选对应的选项,然后点击 **Next** 进入下一步。
在这一步,你可以将已有的 ComfyUI 安装内容迁移到 ComfyUI 桌面版中。选择你电脑上已有的 **ComfyUI** 安装目录,安装程序会自动识别对应目录下的:
* **User Files(用户文件)**
* **Models(模型文件):** 不会进行复制,只是与桌面版进行关联。
* **Custom Nodes(自定义节点):** 节点将会重新进行安装。
不用担心,此步骤不会复制模型文件。你可以按需勾选或取消勾选对应的选项,然后点击 **Next** 进入下一步。
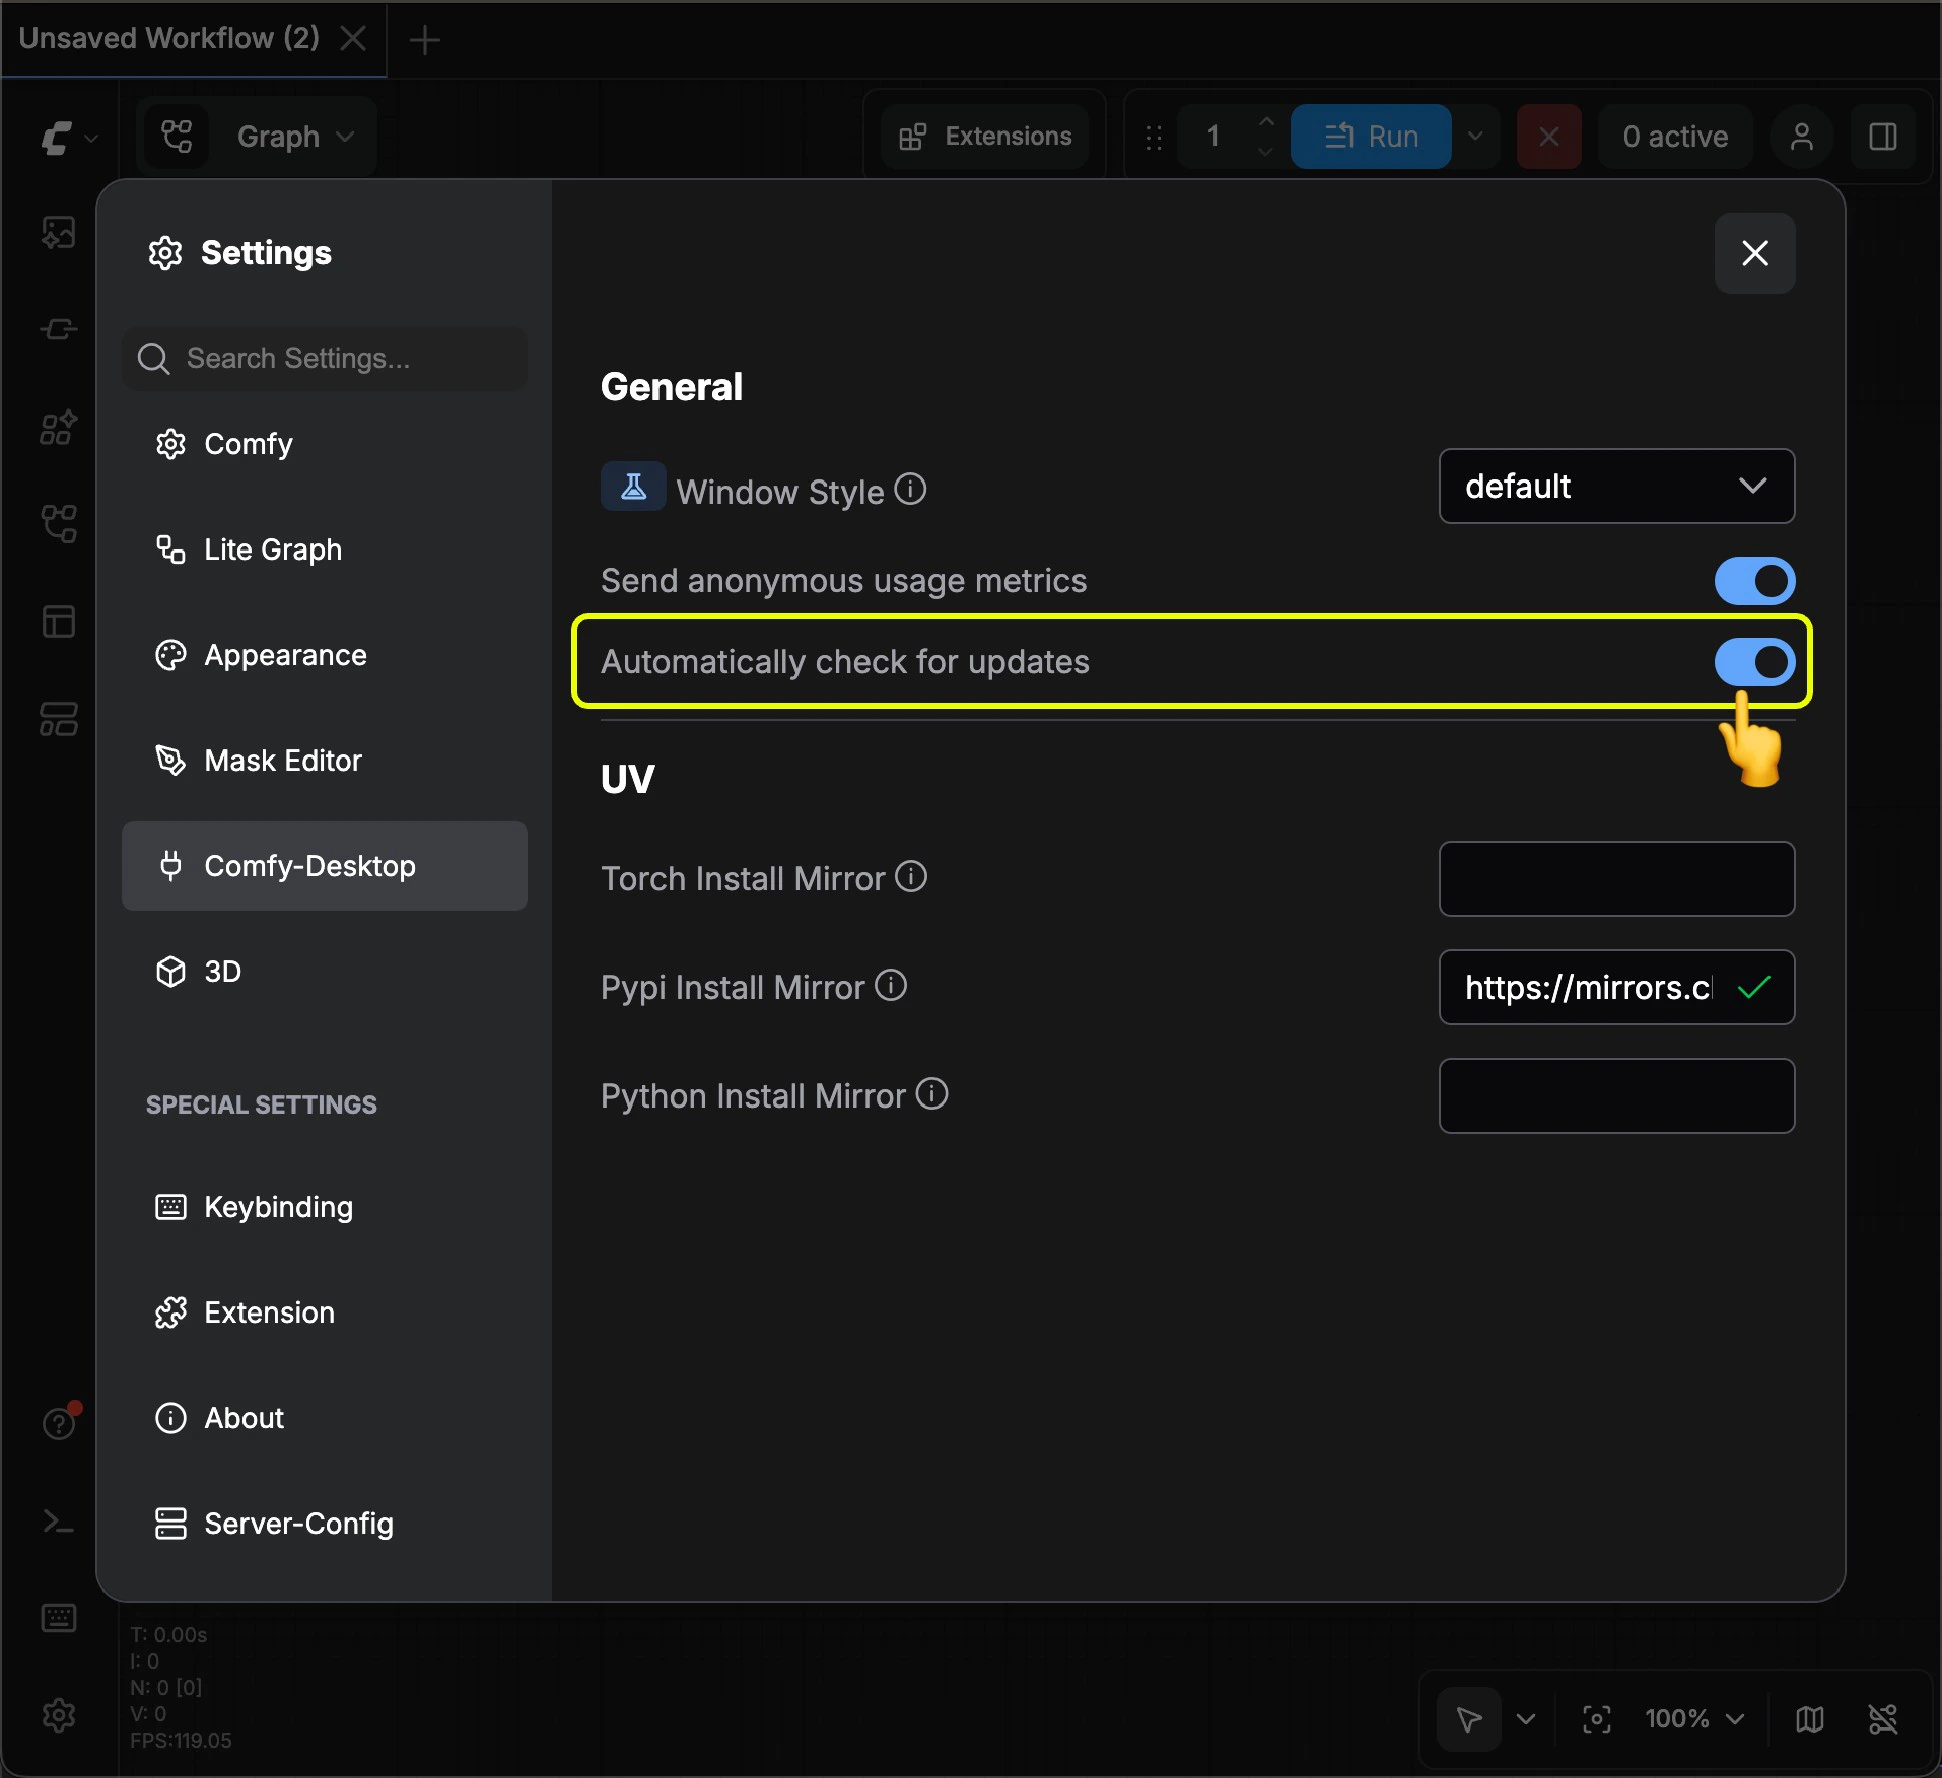
 这一步是偏好设置:
1. **Automatic Updates(自动更新):** 设置是否在 ComfyUI 更新可用时自动更新。
2. **Usage Metrics(使用情况分析):** 如果启用,我们将收集**匿名的使用数据**,用于帮助我们改进 ComfyUI。
3. **Mirror Settings(镜像设置):** 由于程序需要联网下载 Python 以完成相关环境安装,如果你在安装时也如图所示出现红色的 ❌,这可能导致后续安装失败。请参考下面步骤进行处理:
这一步是偏好设置:
1. **Automatic Updates(自动更新):** 设置是否在 ComfyUI 更新可用时自动更新。
2. **Usage Metrics(使用情况分析):** 如果启用,我们将收集**匿名的使用数据**,用于帮助我们改进 ComfyUI。
3. **Mirror Settings(镜像设置):** 由于程序需要联网下载 Python 以完成相关环境安装,如果你在安装时也如图所示出现红色的 ❌,这可能导致后续安装失败。请参考下面步骤进行处理:
 展开对应的镜像设置,找到具体失败的镜像。在当前截图中,错误为 **Python Install Mirror** 镜像下载失败。
对于不同的镜像错误,你可以参考下面的内容尝试手动查找不同的镜像,并进行替换
以下情况主要针对中国境内用户
#### Python 安装镜像
如果默认镜像无法使用,请尝试使用下面的镜像
```
https://python-standalone.org/mirror/astral-sh/python-build-standalone
```
如果你需要查找其它备选 GitHub 的镜像地址,请查找并构建指向 `python-build-standalone` 仓库releases的镜像地址
```
https://github.com/astral-sh/python-build-standalone/releases/download
```
构建类似下面格式的链接
```
https://xxx/astral-sh/python-build-standalone/releases/download
```
展开对应的镜像设置,找到具体失败的镜像。在当前截图中,错误为 **Python Install Mirror** 镜像下载失败。
对于不同的镜像错误,你可以参考下面的内容尝试手动查找不同的镜像,并进行替换
以下情况主要针对中国境内用户
#### Python 安装镜像
如果默认镜像无法使用,请尝试使用下面的镜像
```
https://python-standalone.org/mirror/astral-sh/python-build-standalone
```
如果你需要查找其它备选 GitHub 的镜像地址,请查找并构建指向 `python-build-standalone` 仓库releases的镜像地址
```
https://github.com/astral-sh/python-build-standalone/releases/download
```
构建类似下面格式的链接
```
https://xxx/astral-sh/python-build-standalone/releases/download
```
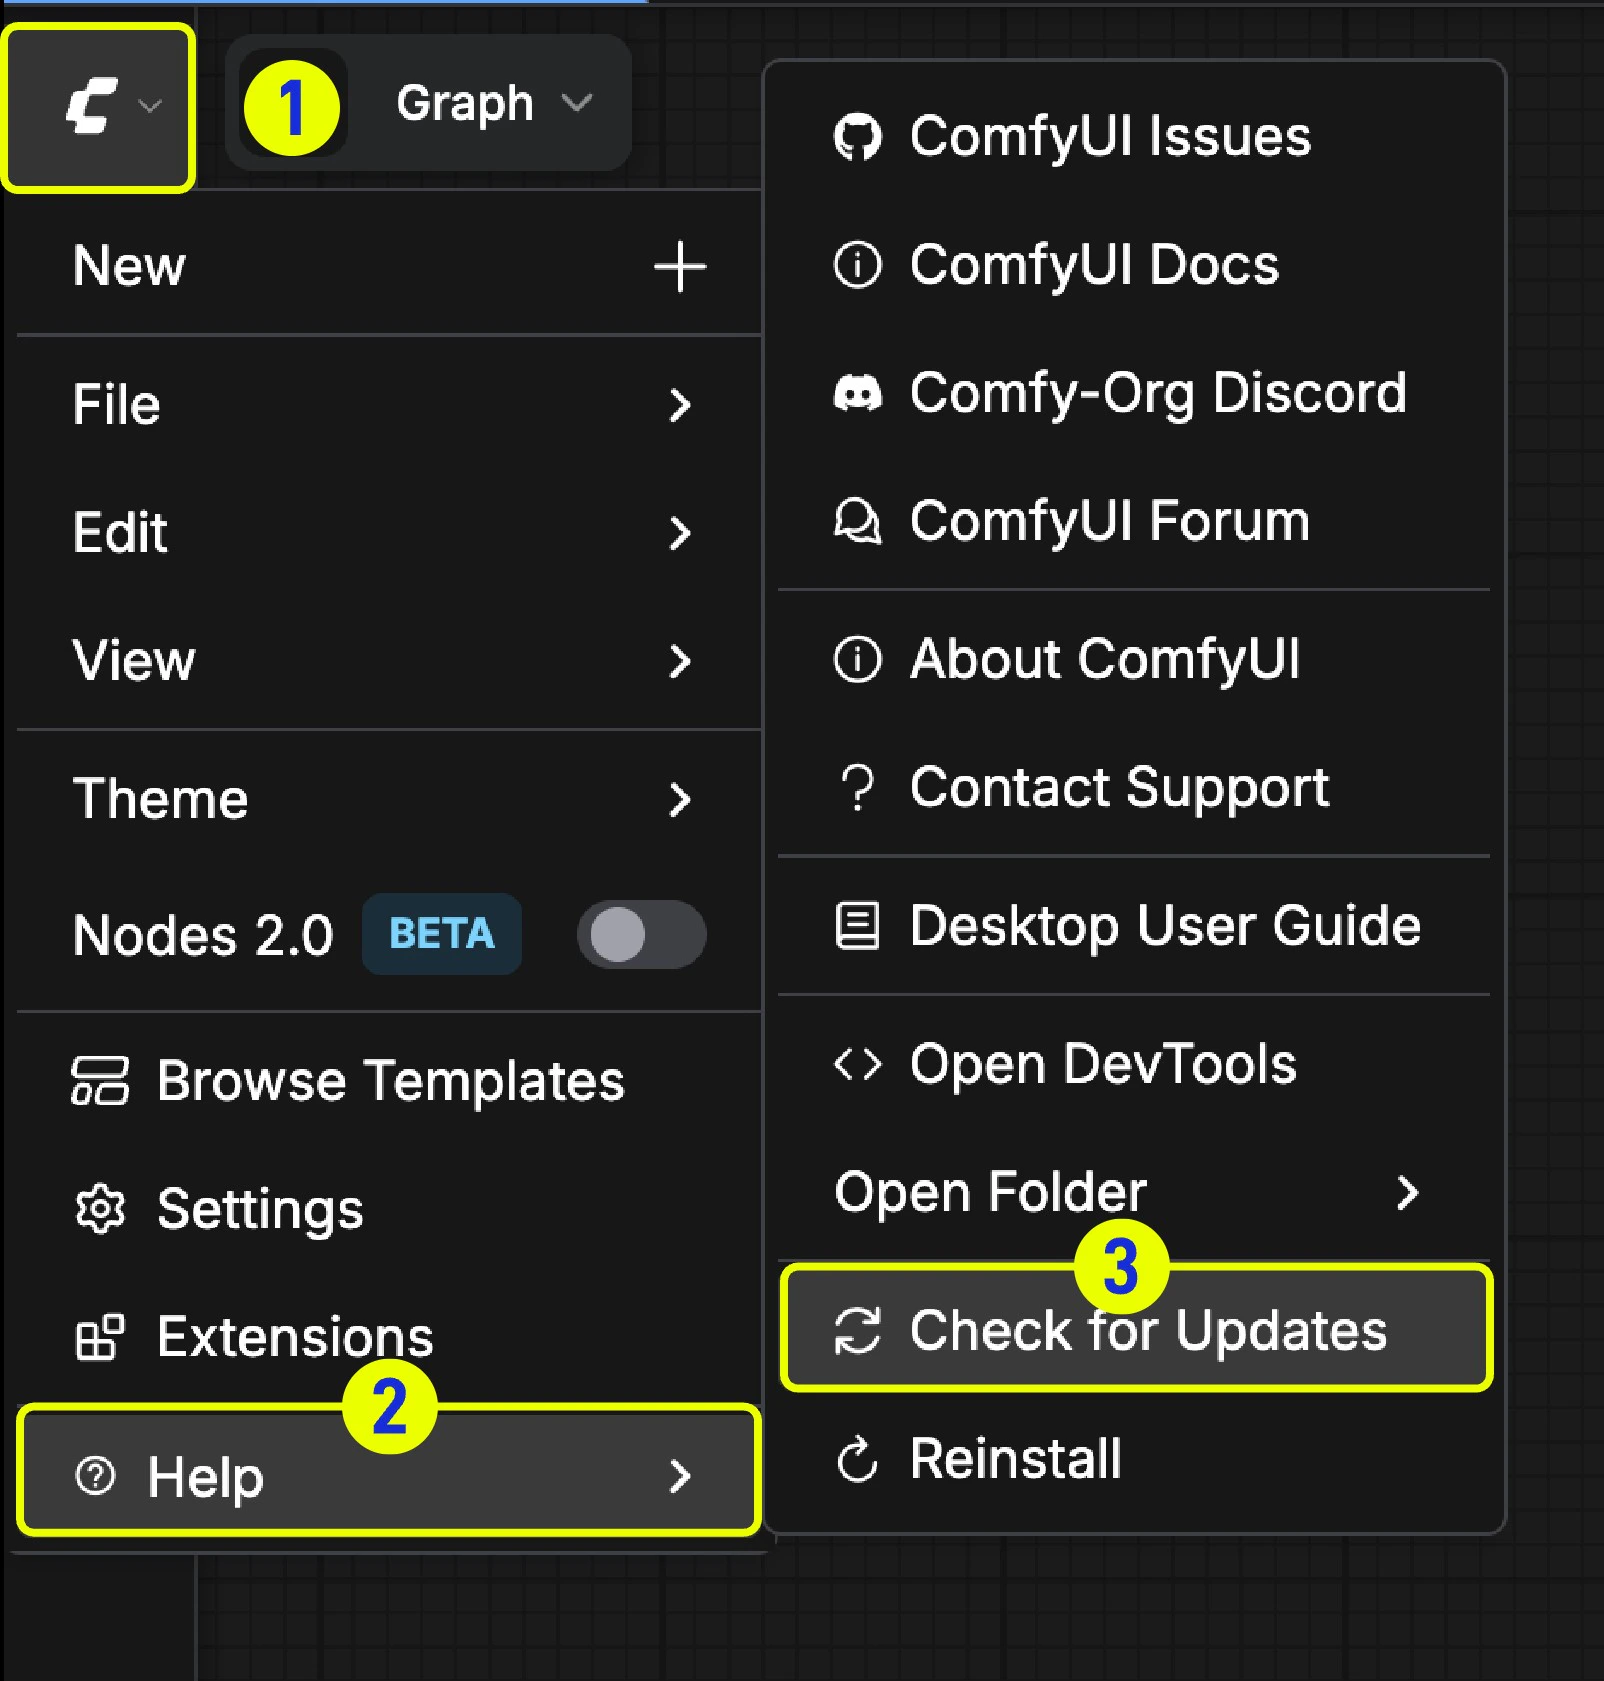
 你也可以在 `菜单` --> `帮助` --> `检查更新` 中选择手动检查是否有可用的更新
 ## 添加外部模型路径
如果你想要在 `ComfyUI/models` 之外管理你的模型文件,可能出于以下原因:
* 你有多个 ComfyUI 实例,你想要让这些实例共享模型文件,从而减少磁盘占用
* 你有多个不同的类型的 GUI 程序,如:WebUI, 你想要他们共用模型文件
* 模型文件无法被识别或读取到
我们提供了通过 `extra_model_paths.yaml` 配置文件来添加额外模型搜索路径的方法。
### 不同 ComfyUI 版本配置文件位置
## 添加外部模型路径
如果你想要在 `ComfyUI/models` 之外管理你的模型文件,可能出于以下原因:
* 你有多个 ComfyUI 实例,你想要让这些实例共享模型文件,从而减少磁盘占用
* 你有多个不同的类型的 GUI 程序,如:WebUI, 你想要他们共用模型文件
* 模型文件无法被识别或读取到
我们提供了通过 `extra_model_paths.yaml` 配置文件来添加额外模型搜索路径的方法。
### 不同 ComfyUI 版本配置文件位置
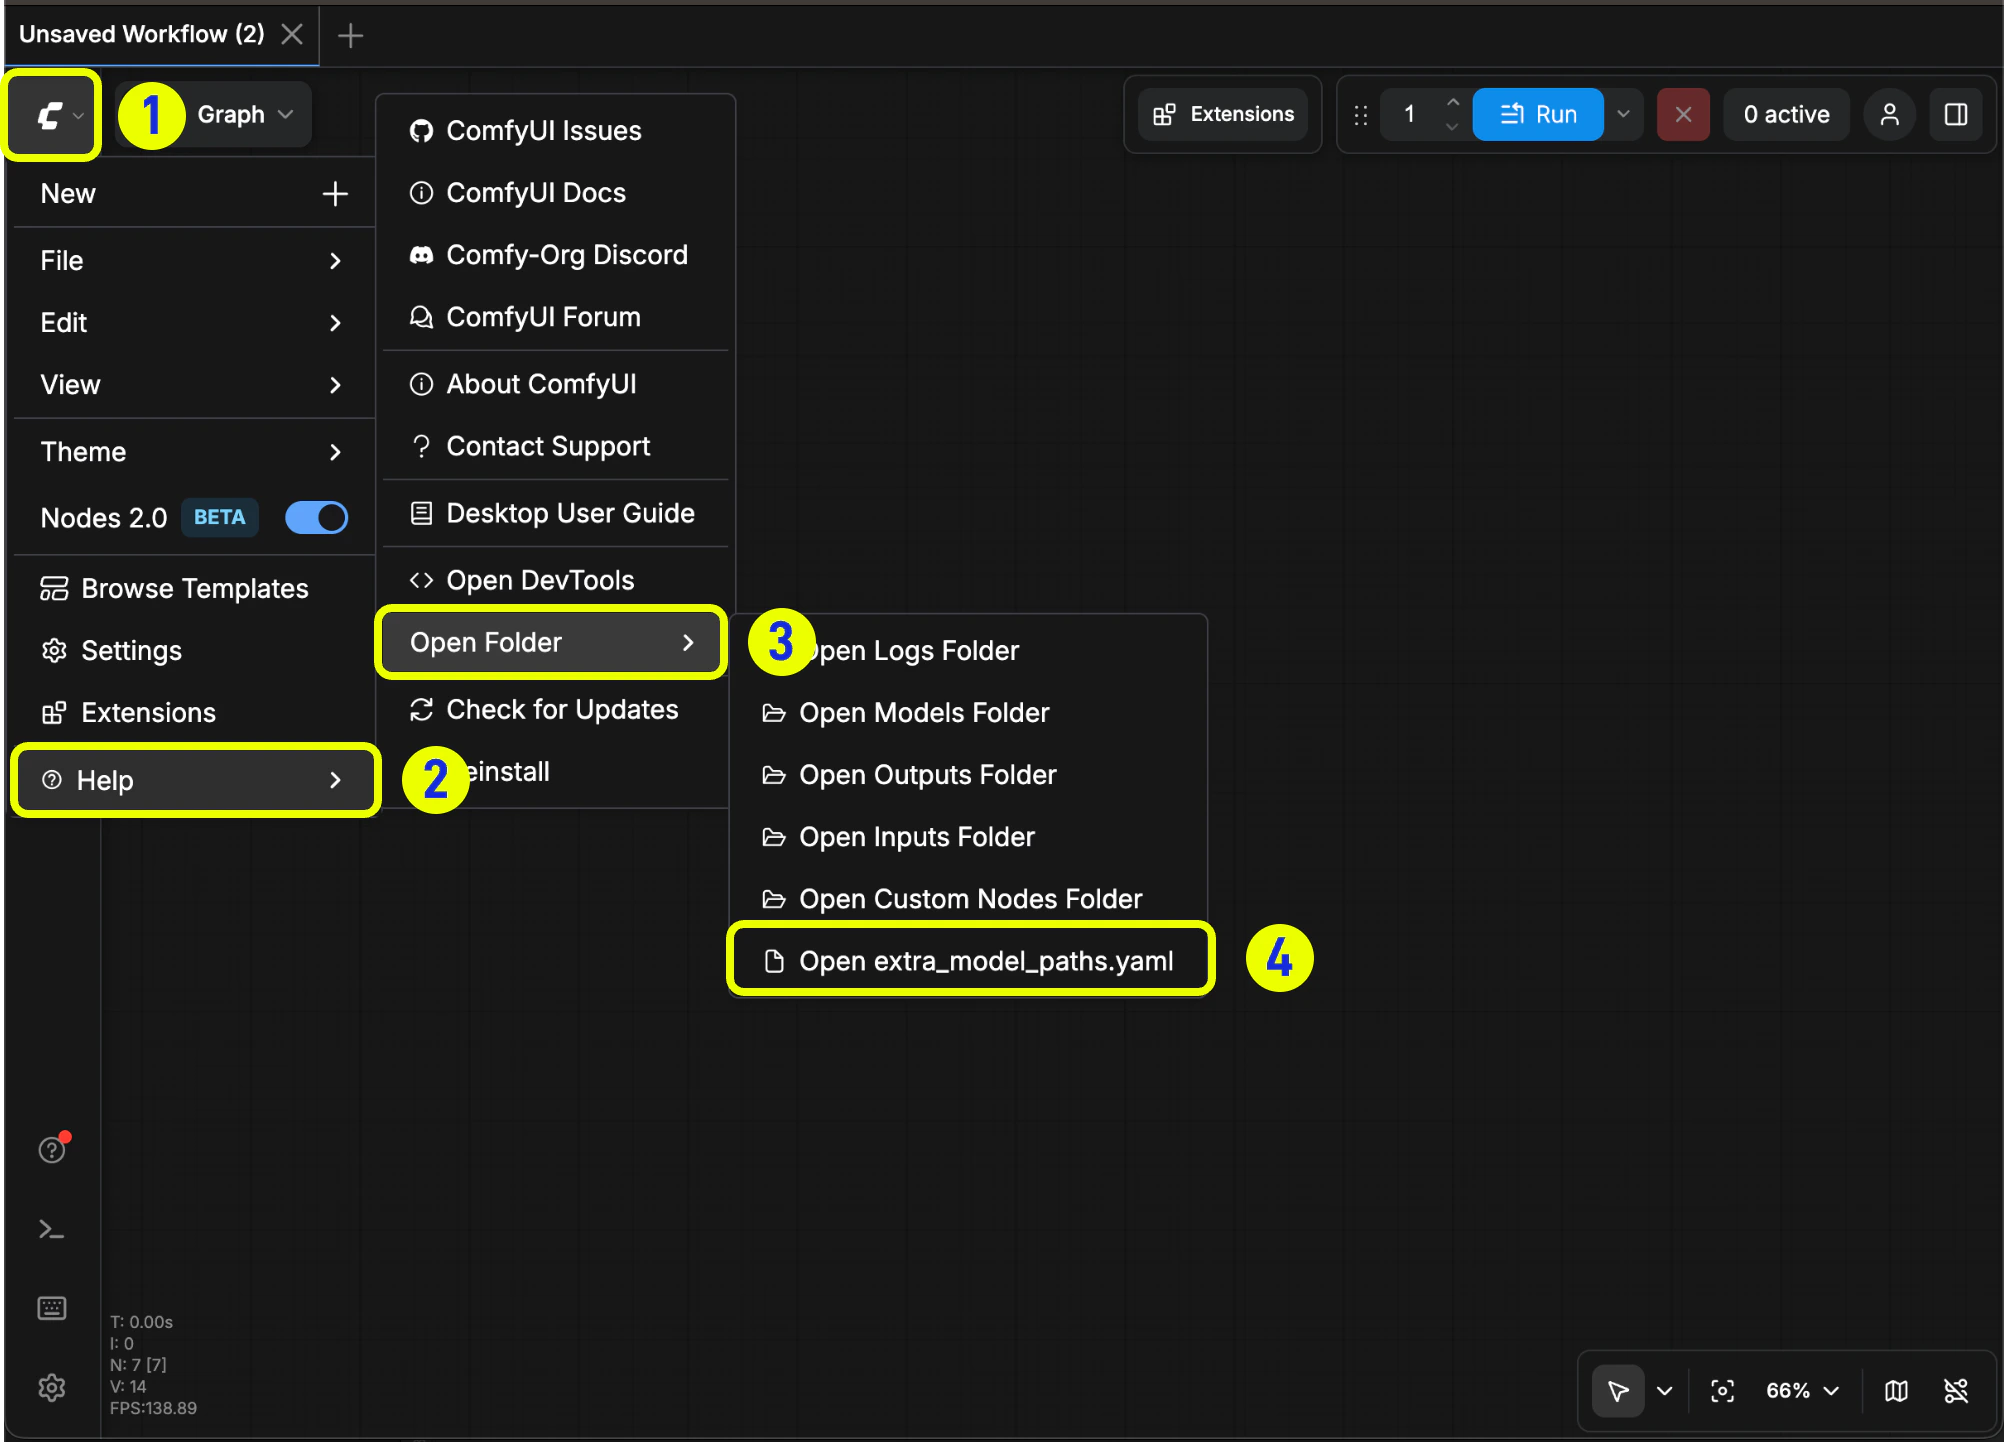 或者通过下面的位置打开:
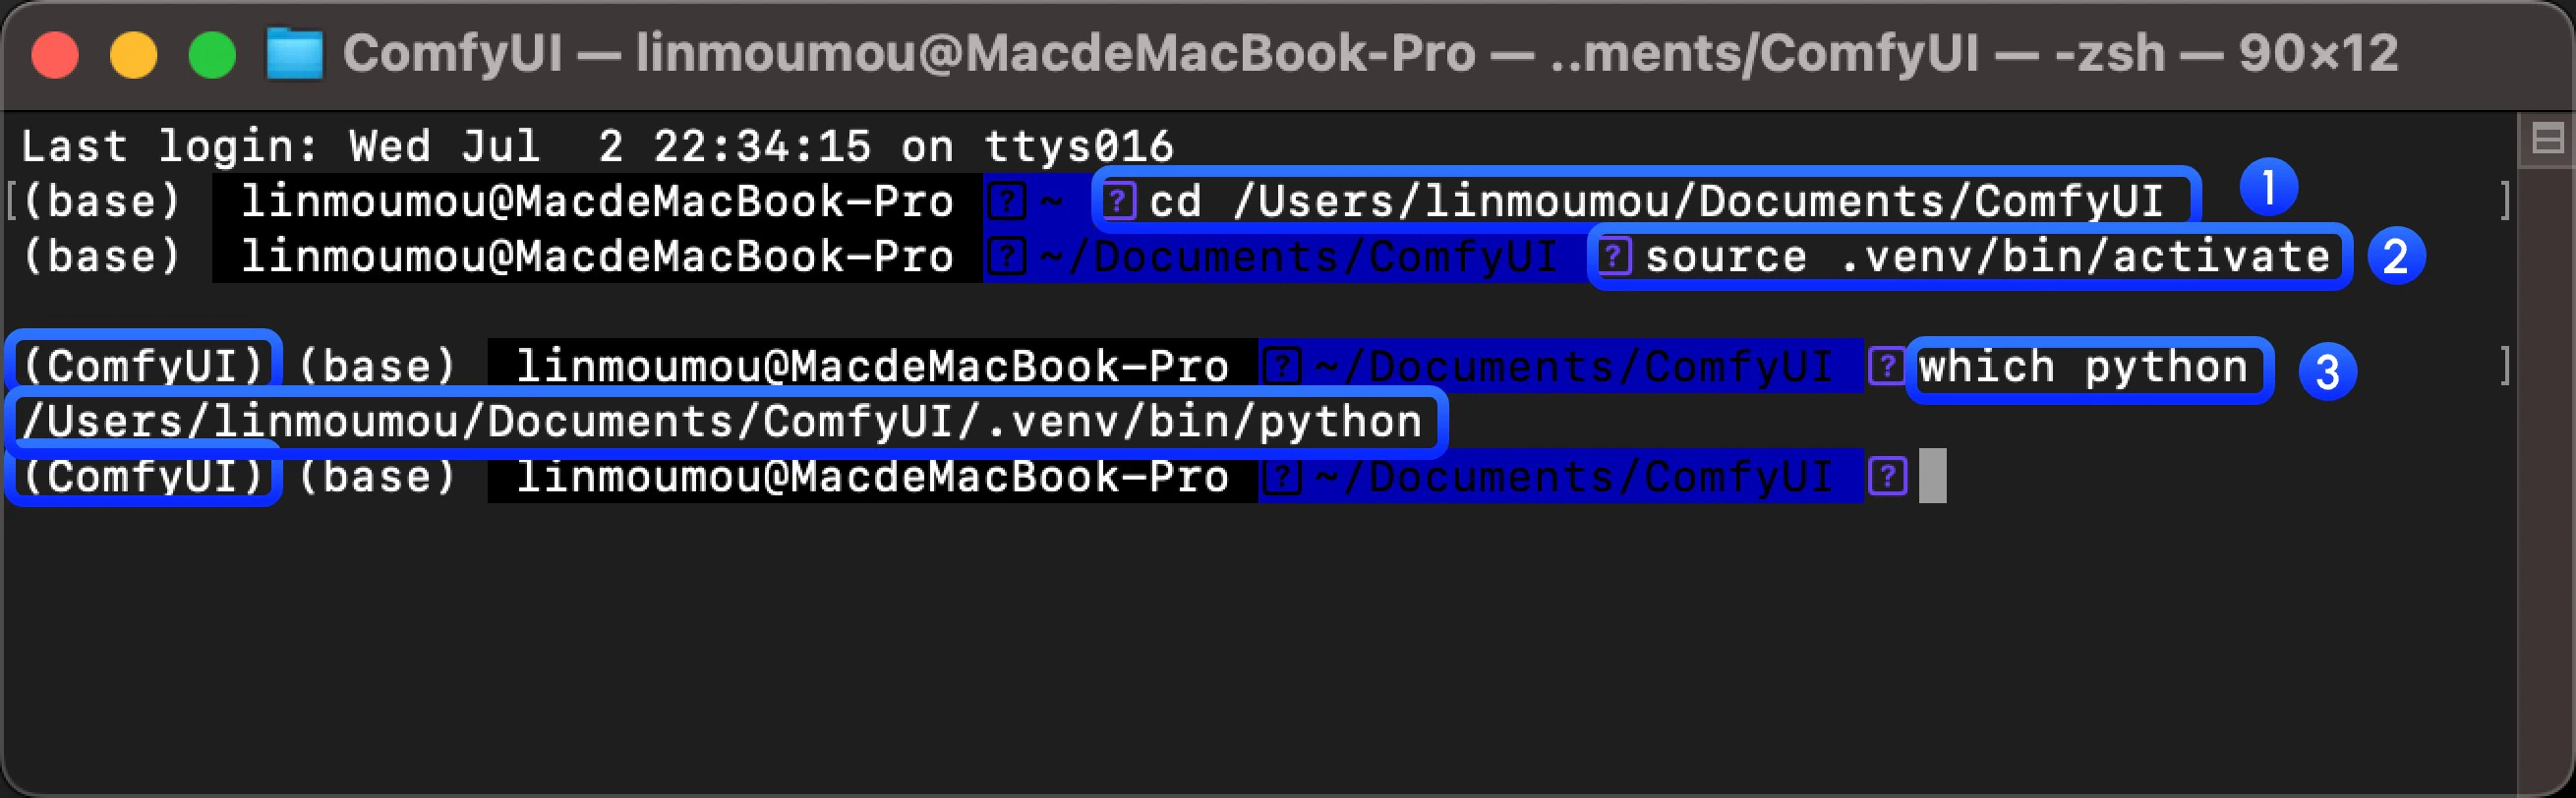
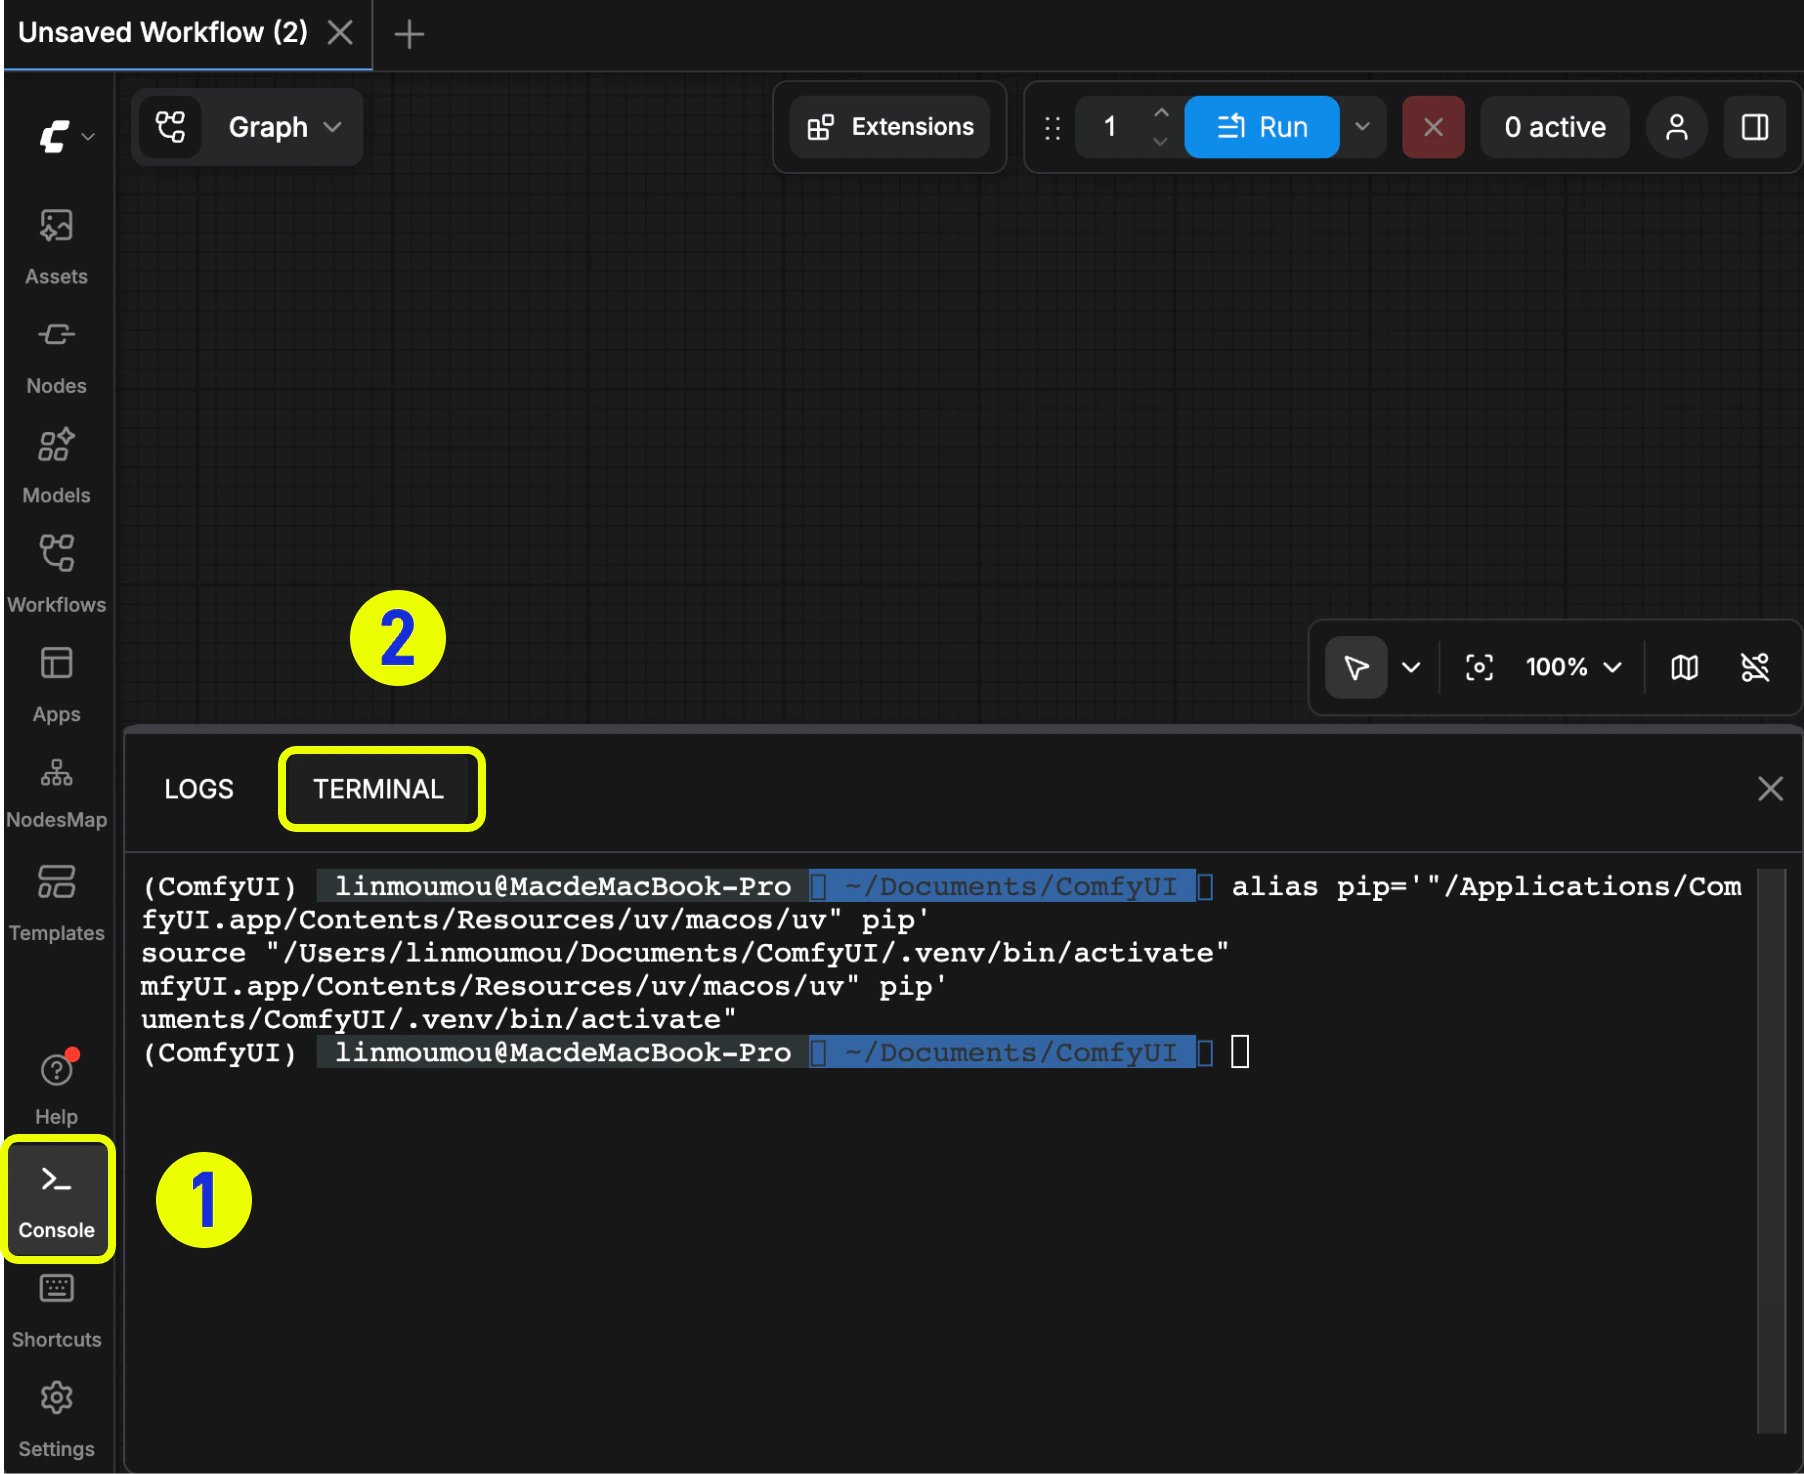 1. 点击菜单栏的 icon 打开底部面板
2. 点击 `Terminal` 打开终端
3. 如果你想要看对应环境的 python 安装位置,可以使用下面的命令
1. 点击菜单栏的 icon 打开底部面板
2. 点击 `Terminal` 打开终端
3. 如果你想要看对应环境的 python 安装位置,可以使用下面的命令
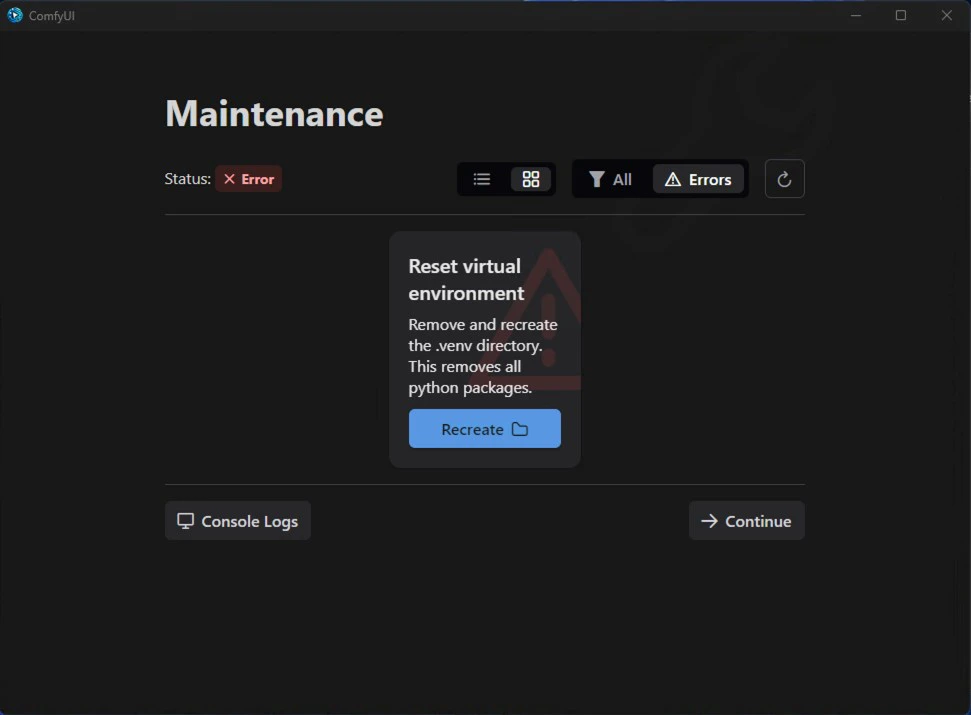
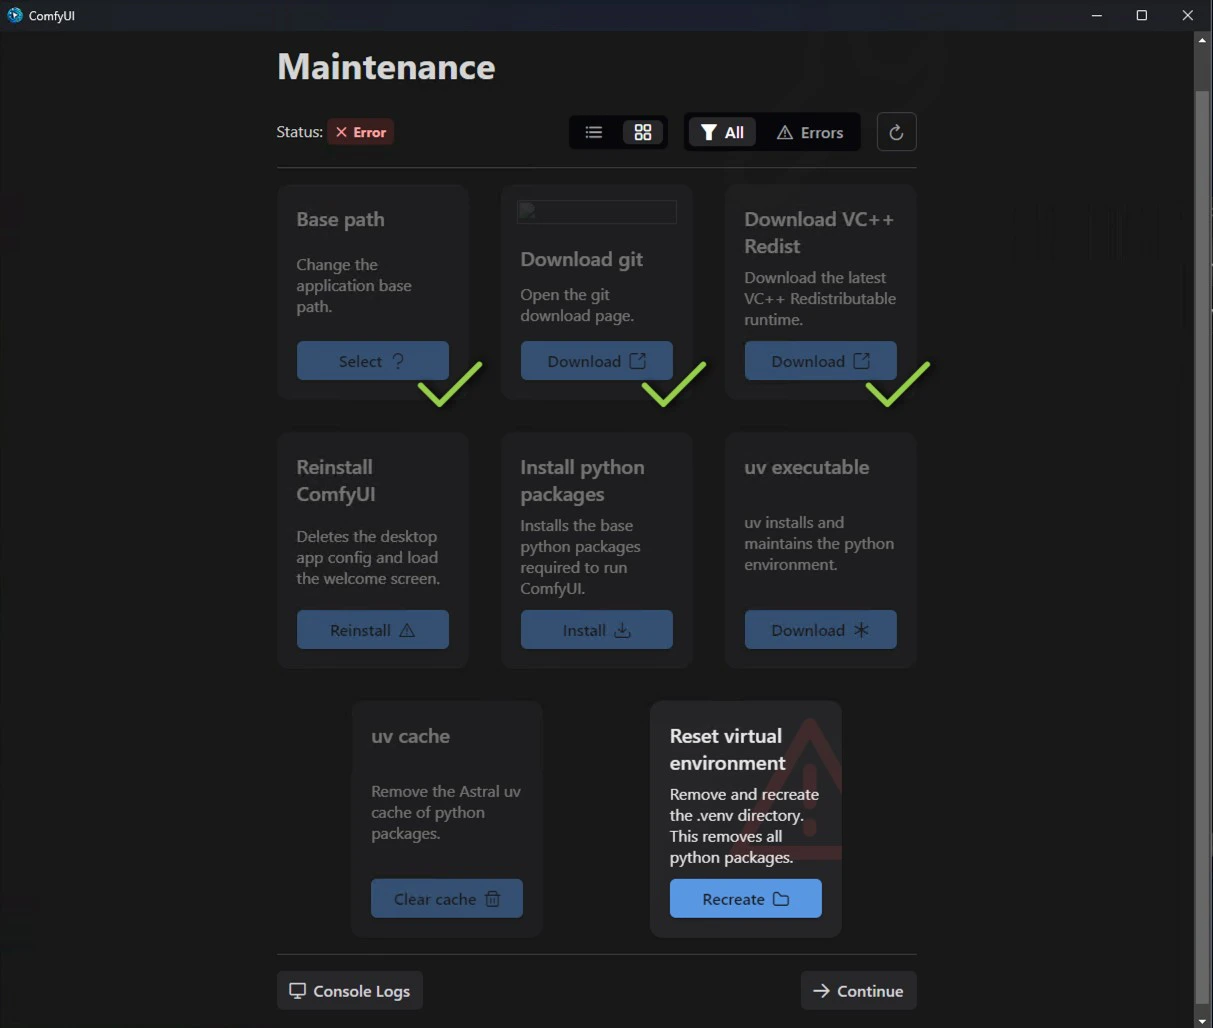
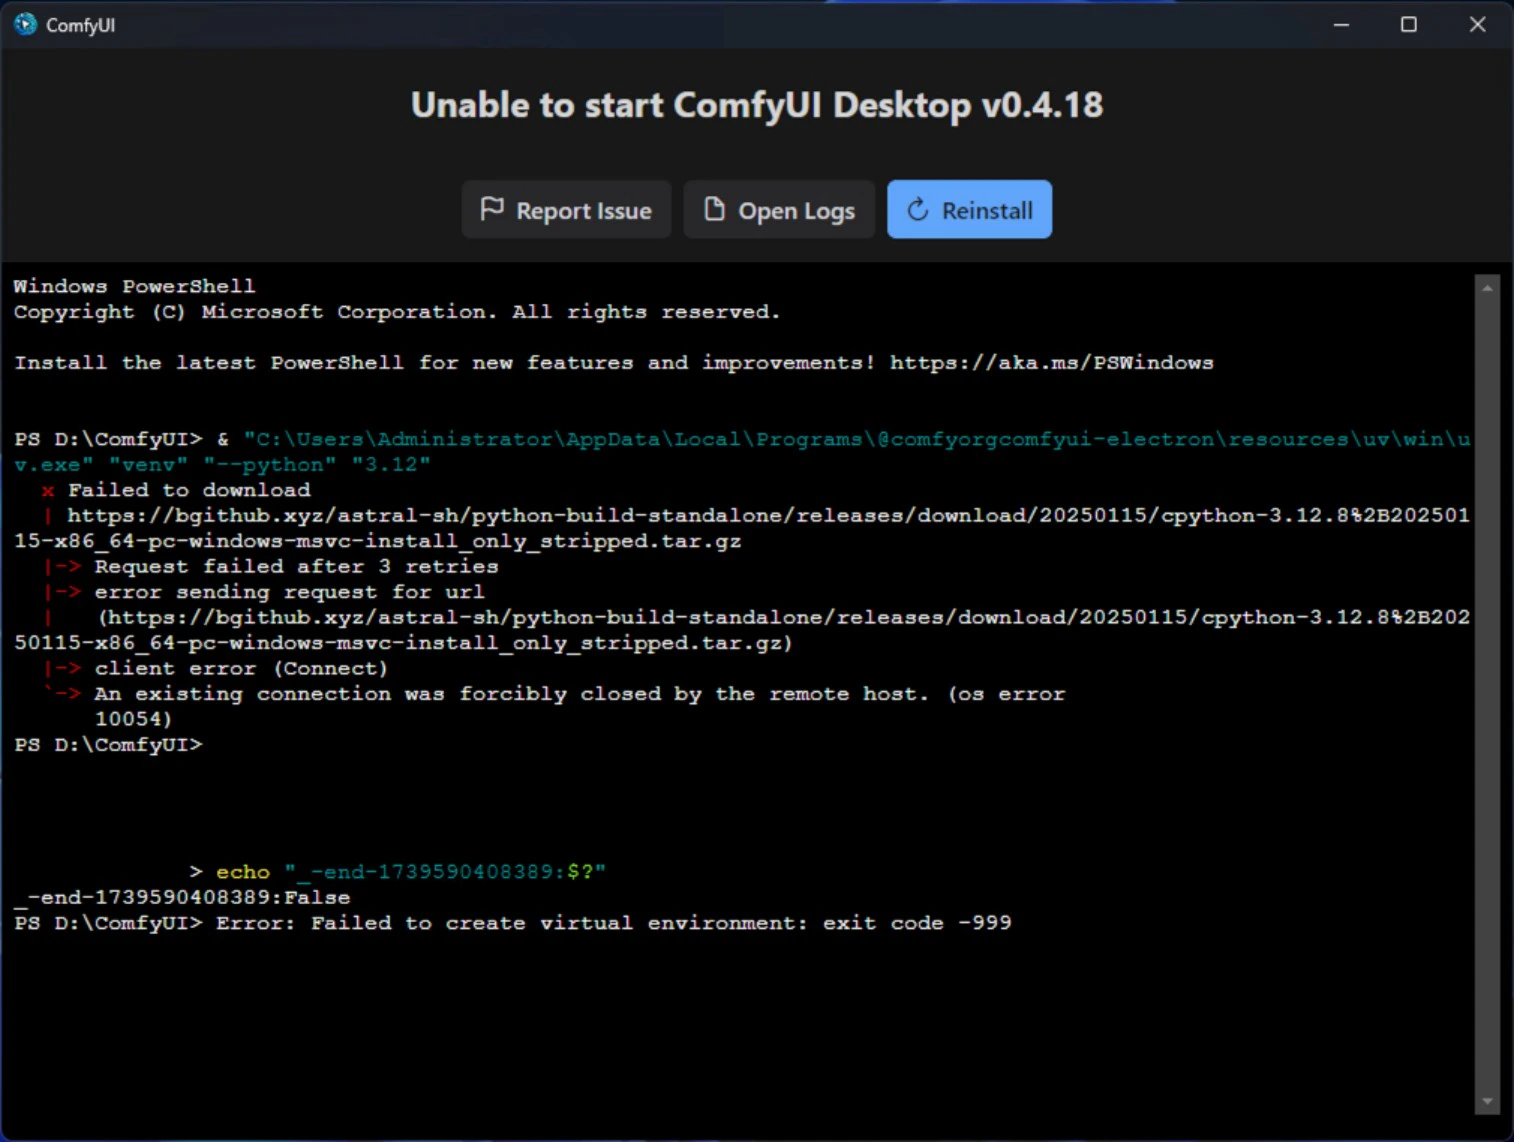
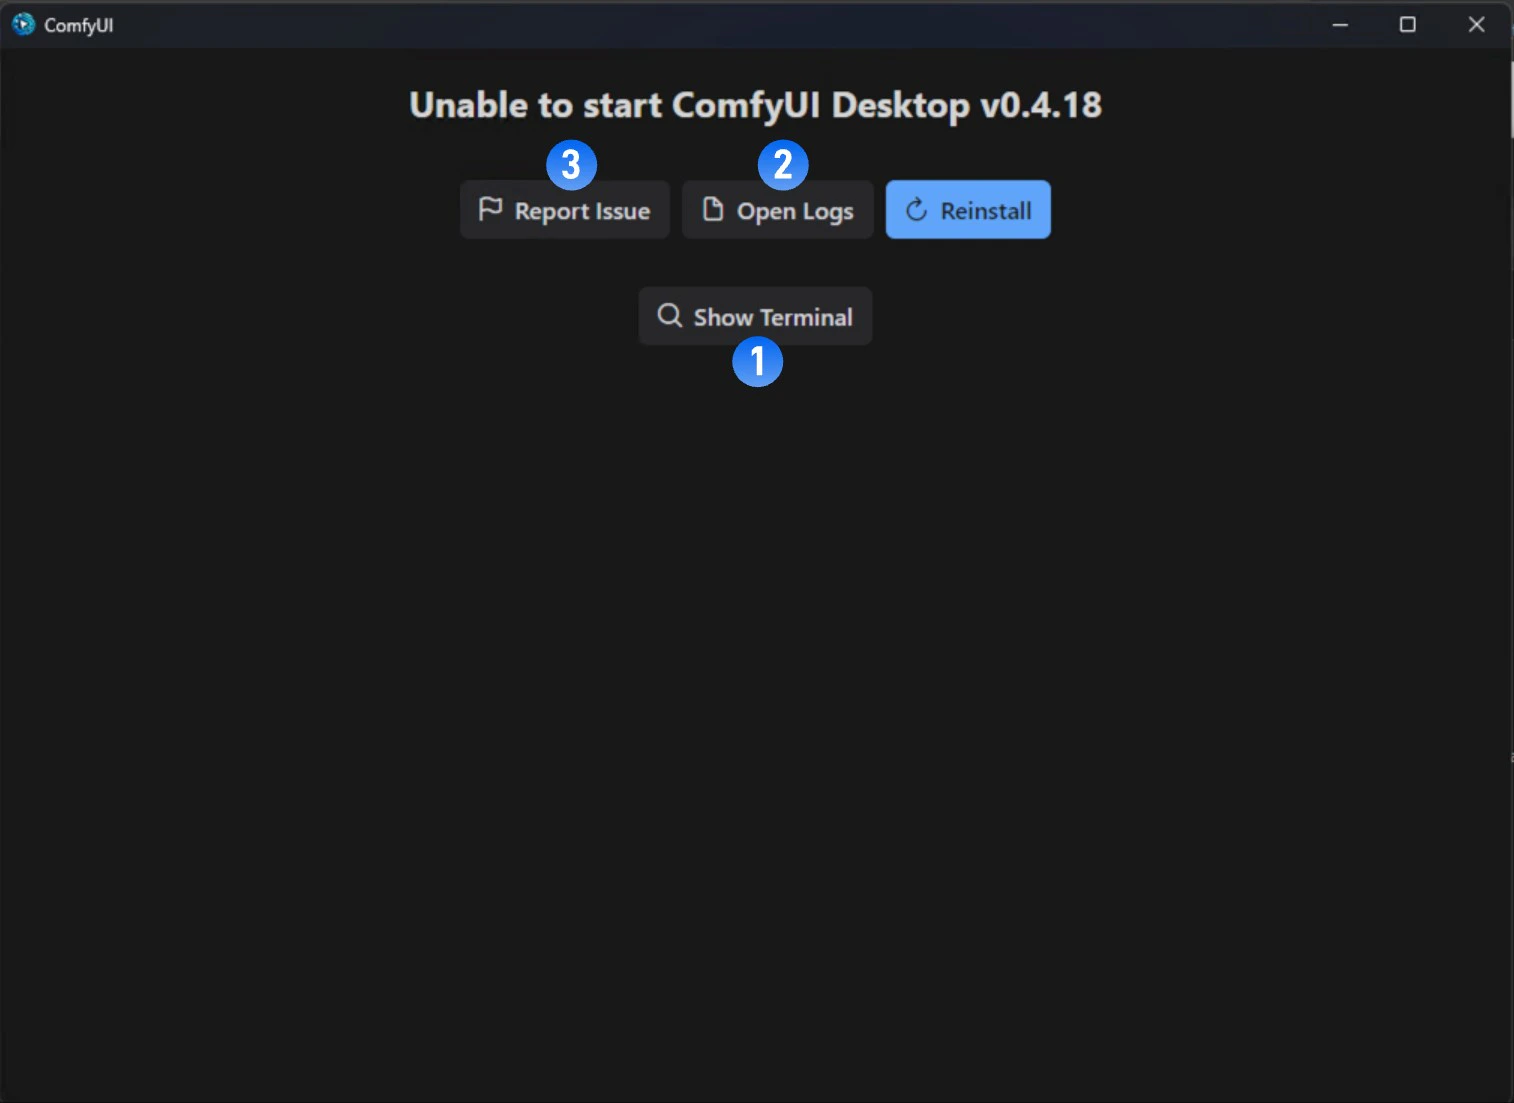 此时建议你采取以下几种方式查找错误原因
1. 点击 `Show Teriminal` 查看错误问题输出
2. 点击 `Open Logs` 查看安装过程日志
3. 访问官方论坛查找错误反馈
4. 点击`Reinstall`尝试重新安装
建议在提交反馈之前,你可以将对应的**错误输出**以及 **log 文件**信息提供给类似 **GPT**一类的工具
此时建议你采取以下几种方式查找错误原因
1. 点击 `Show Teriminal` 查看错误问题输出
2. 点击 `Open Logs` 查看安装过程日志
3. 访问官方论坛查找错误反馈
4. 点击`Reinstall`尝试重新安装
建议在提交反馈之前,你可以将对应的**错误输出**以及 **log 文件**信息提供给类似 **GPT**一类的工具
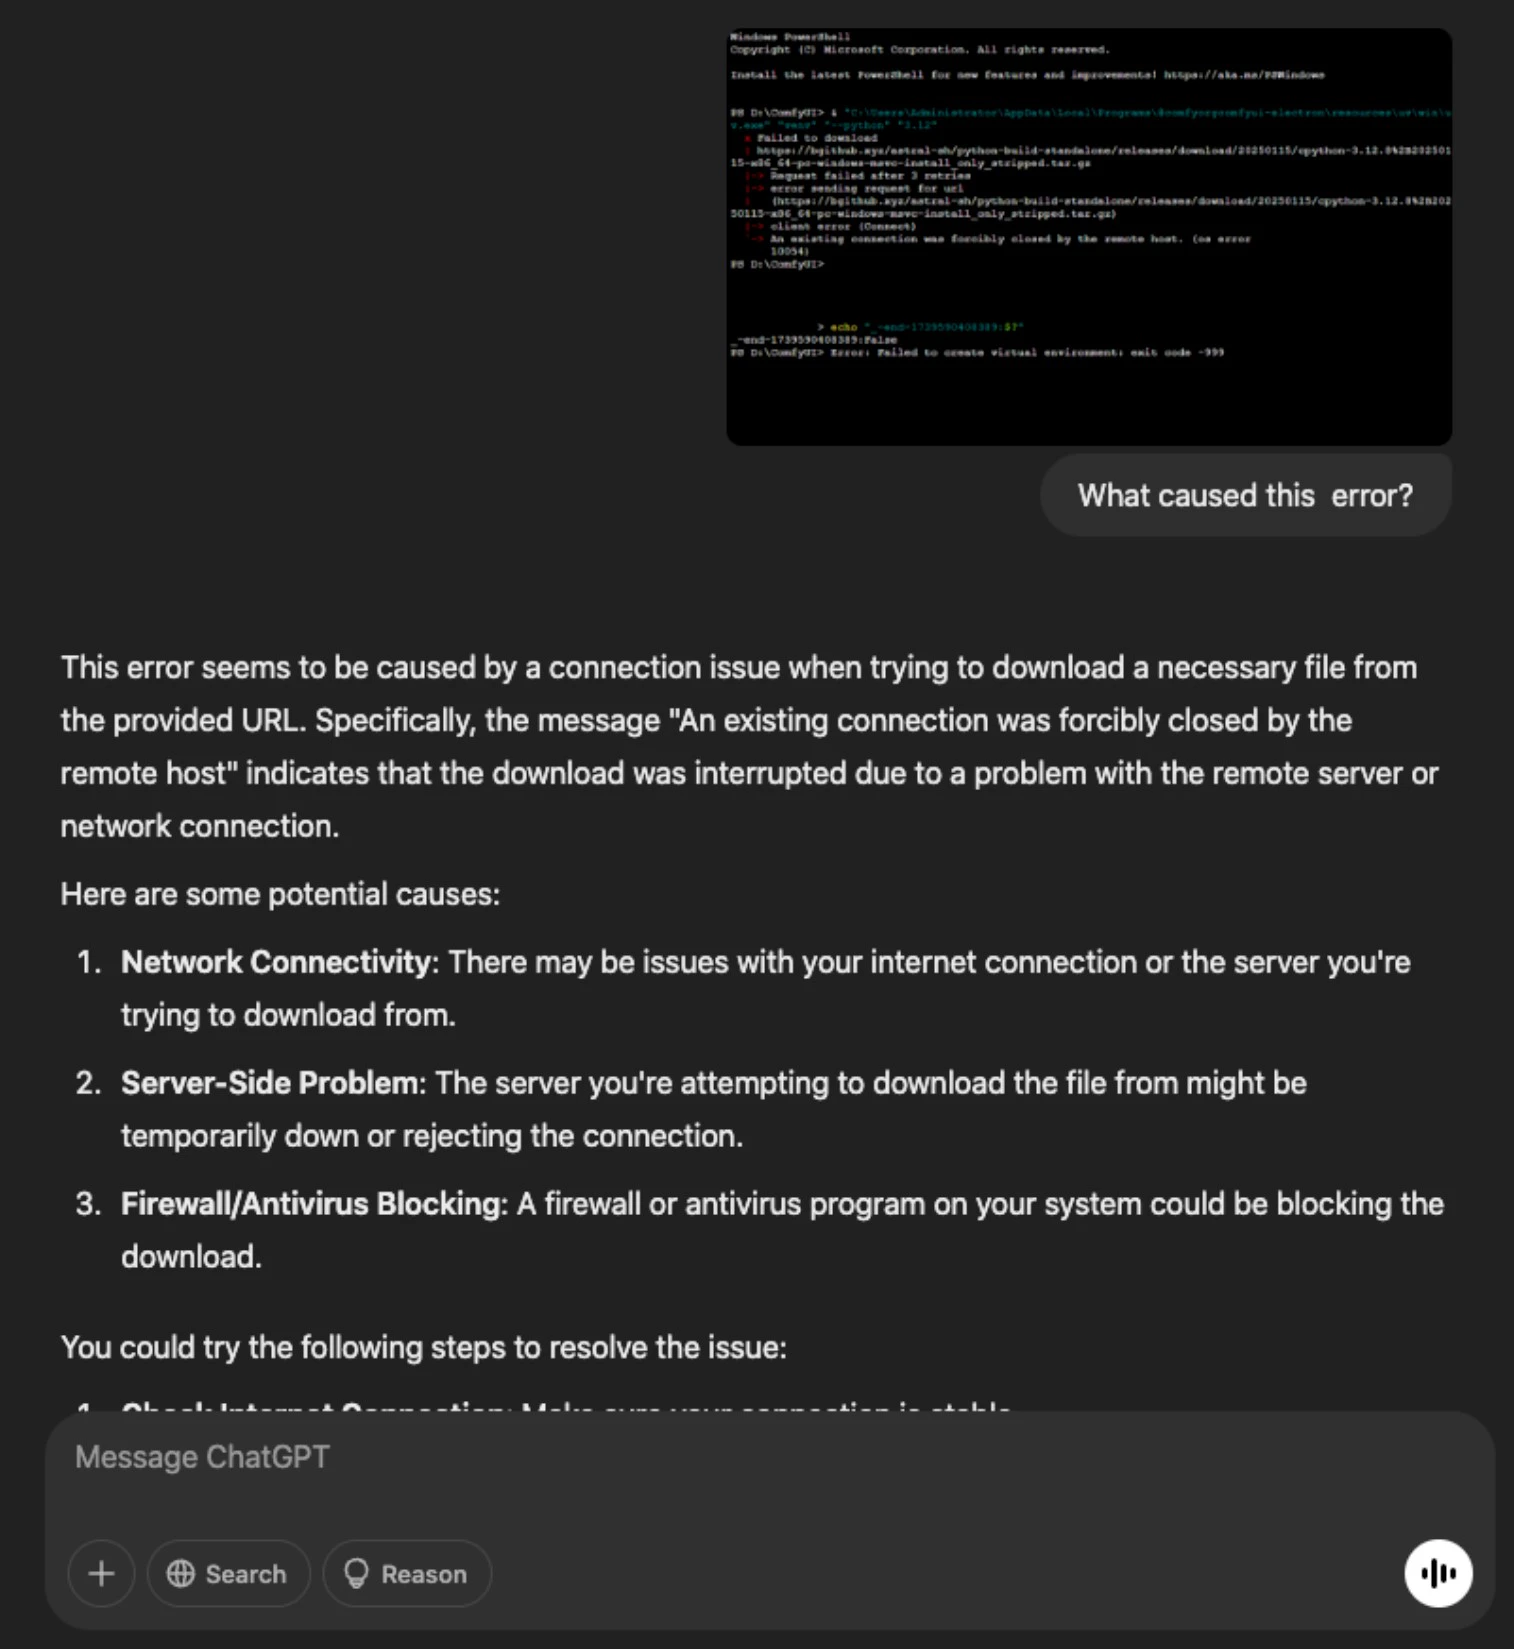 如上图,询问对应错误的原因,或者完全删除 ComfyUI 后进行安装重试
### 反馈错误
如果在安装过程中,你发生了任何错误,请通过以下任意方式查看是否有类似错误反馈,或者向我们提交错误
* Github Issues: [https://github.com/Comfy-Org/desktop/issues](https://github.com/Comfy-Org/desktop/issues)
* Comfy 官方论坛: [https://forum.comfy.org/](https://forum.comfy.org/)
请在提交错误时确保提交了以下日志以及配置文件,方便我们进行问题的定位和查找
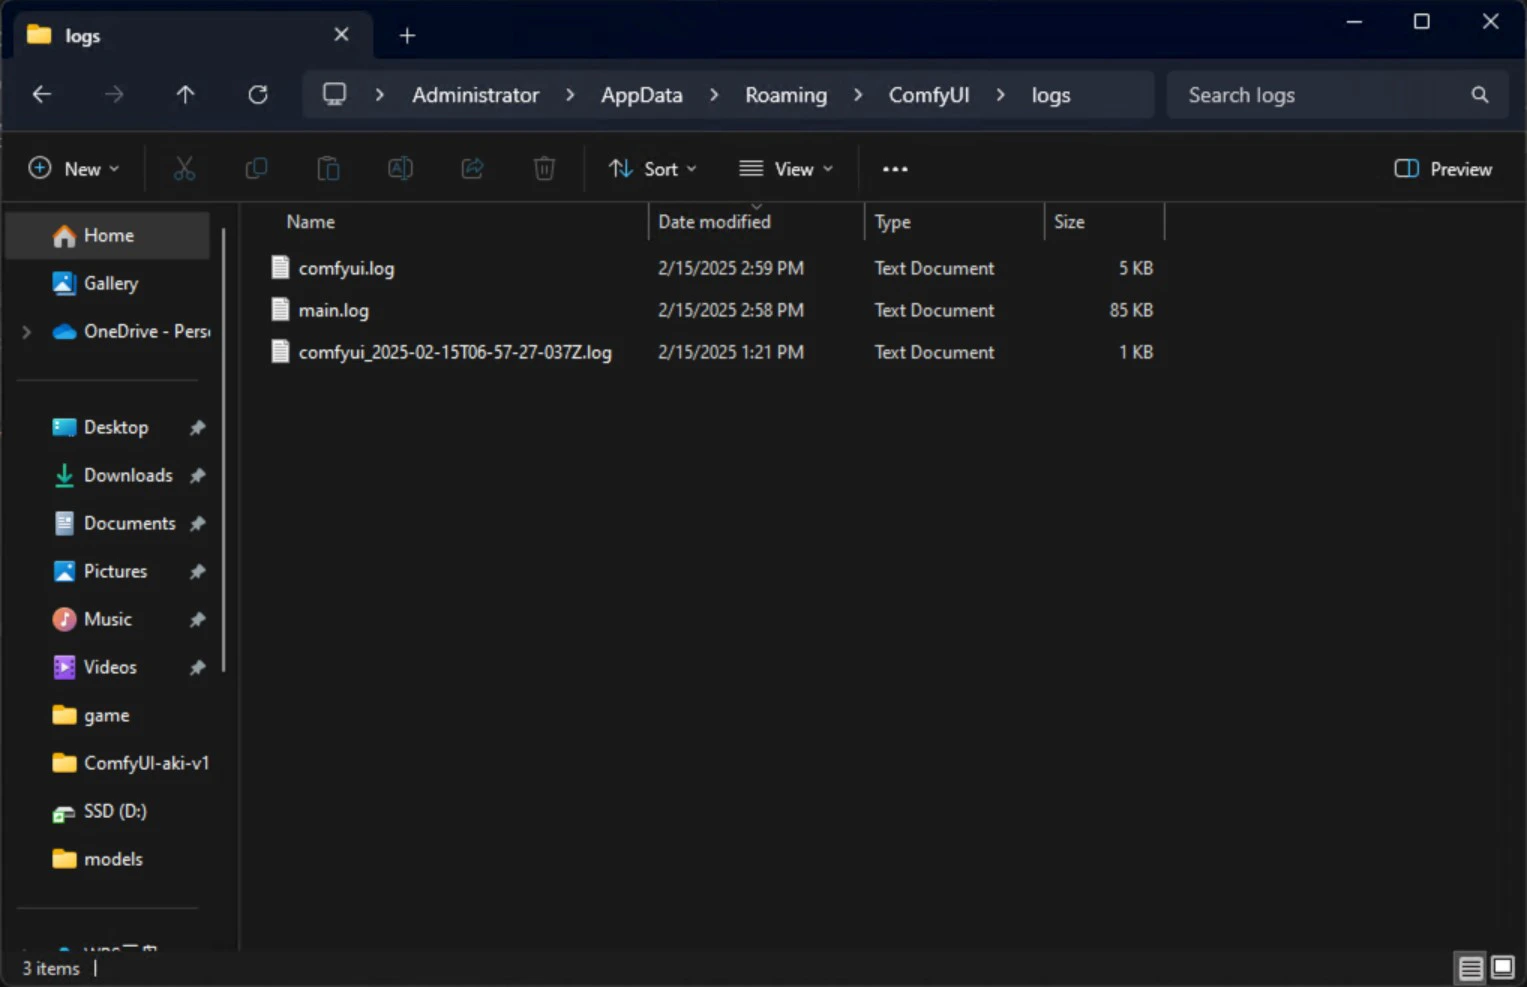
1. 日志文件
| 文件名 | 描述 | 位置 |
| ----------- | ------------------------------------------- | ------------ |
| main.log | 包含与桌面应用和服务器启动相关的日志,来自桌面的 Electron 进程。 | {log_path_0} |
| comfyui.log | 包含与 ComfyUI 正常运行相关的日志,例如核心 ComfyUI 进程的终端输出。 | {log_path_0} |
如上图,询问对应错误的原因,或者完全删除 ComfyUI 后进行安装重试
### 反馈错误
如果在安装过程中,你发生了任何错误,请通过以下任意方式查看是否有类似错误反馈,或者向我们提交错误
* Github Issues: [https://github.com/Comfy-Org/desktop/issues](https://github.com/Comfy-Org/desktop/issues)
* Comfy 官方论坛: [https://forum.comfy.org/](https://forum.comfy.org/)
请在提交错误时确保提交了以下日志以及配置文件,方便我们进行问题的定位和查找
1. 日志文件
| 文件名 | 描述 | 位置 |
| ----------- | ------------------------------------------- | ------------ |
| main.log | 包含与桌面应用和服务器启动相关的日志,来自桌面的 Electron 进程。 | {log_path_0} |
| comfyui.log | 包含与 ComfyUI 正常运行相关的日志,例如核心 ComfyUI 进程的终端输出。 | {log_path_0} |
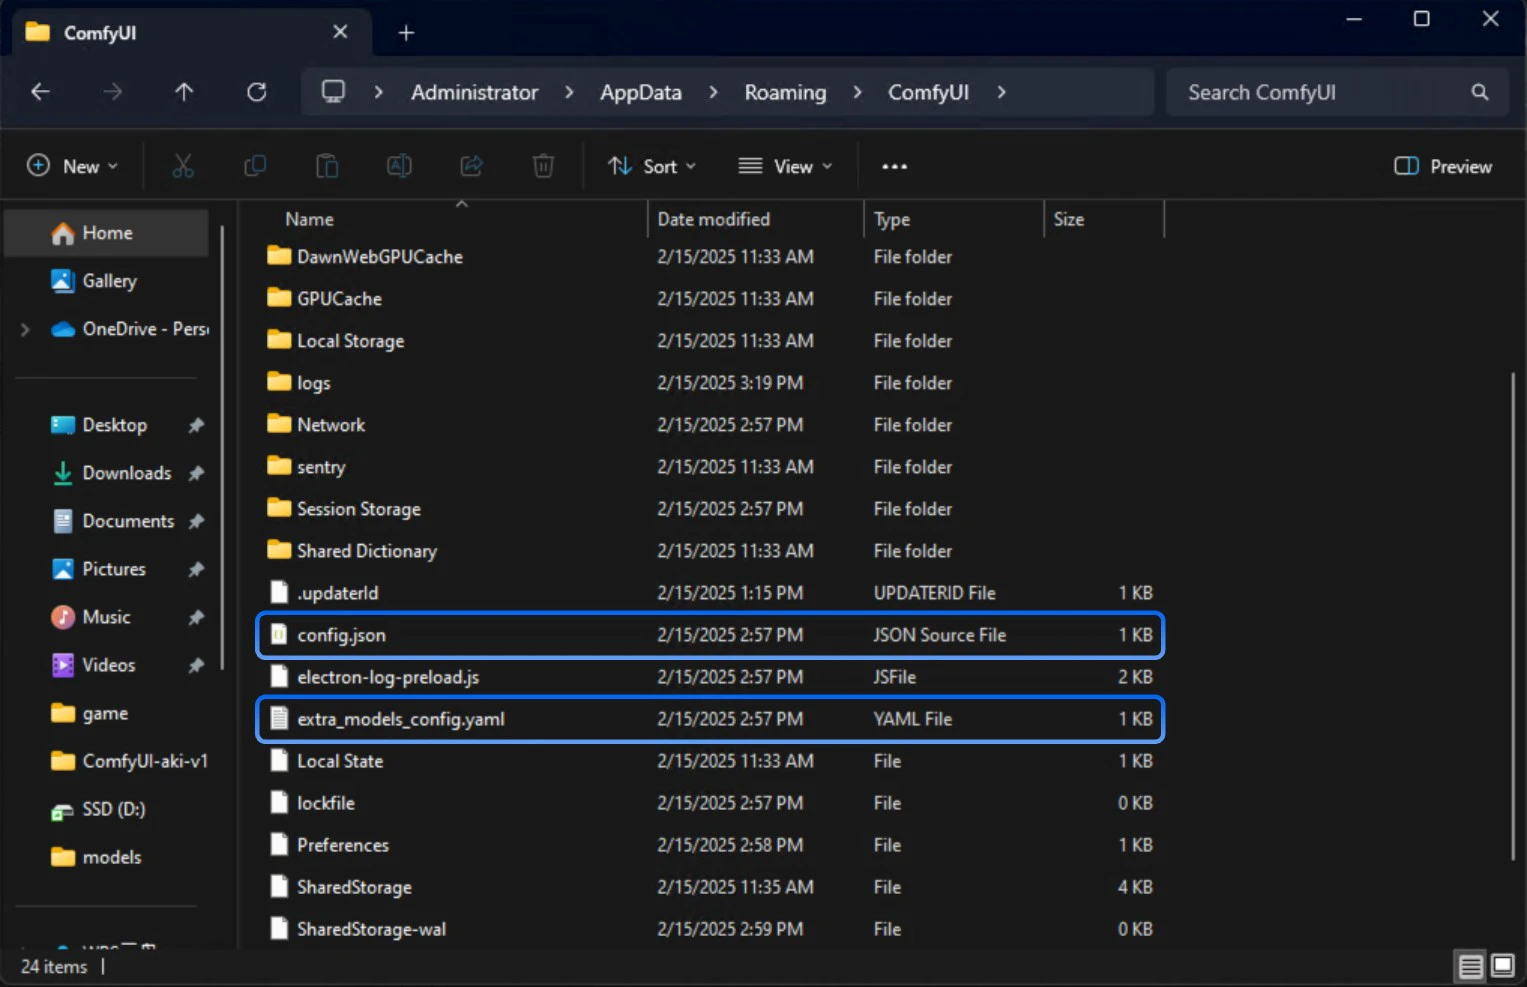
 2. 配置文件
| 文件名 | 描述 | 位置 |
| ------------------------ | ---------------------------- | --------------- |
| extra\_model\_paths.yaml | 包含 ComfyUI 将搜索模型和自定义节点的额外路径。 | {config_path_0} |
| config.json | 包含应用配置。此文件通常不应直接编辑。 | {config_path_0} |
2. 配置文件
| 文件名 | 描述 | 位置 |
| ------------------------ | ---------------------------- | --------------- |
| extra\_model\_paths.yaml | 包含 ComfyUI 将搜索模型和自定义节点的额外路径。 | {config_path_0} |
| config.json | 包含应用配置。此文件通常不应直接编辑。 | {config_path_0} |