> ## Documentation Index
> Fetch the complete documentation index at: https://dripart-docs-recommend-assets-api.mintlify.site/llms.txt
> Use this file to discover all available pages before exploring further.
# Cloud API 概述
> 通过编程方式访问 Comfy Cloud,在云端运行工作流、管理文件并监控执行状态
**实验性 API:** 此 API 目前处于实验阶段,可能会发生变更。端点、请求/响应格式和行为可能会在不另行通知的情况下进行修改。
# Comfy Cloud API
Comfy Cloud API 提供以编程方式访问 Comfy Cloud 的能力,可在云端基础设施上运行工作流。该 API 与本地 ComfyUI 的 API 兼容,便于迁移现有集成。
**需要订阅:** 通过 API 运行工作流需要有效的 Comfy Cloud 订阅。详情请参阅[定价方案](https://www.comfy.org/cloud/pricing?utm_source=docs\&utm_campaign=cloud-api)。
## 基础 URL
```
https://cloud.comfy.org
```
## 身份验证
所有 API 请求都需要通过 `X-API-Key` 请求头传递 API 密钥。
### 获取 API 密钥
请访问 [https://platform.comfy.org/login](https://platform.comfy.org/login) 并使用对应的账号进行登录
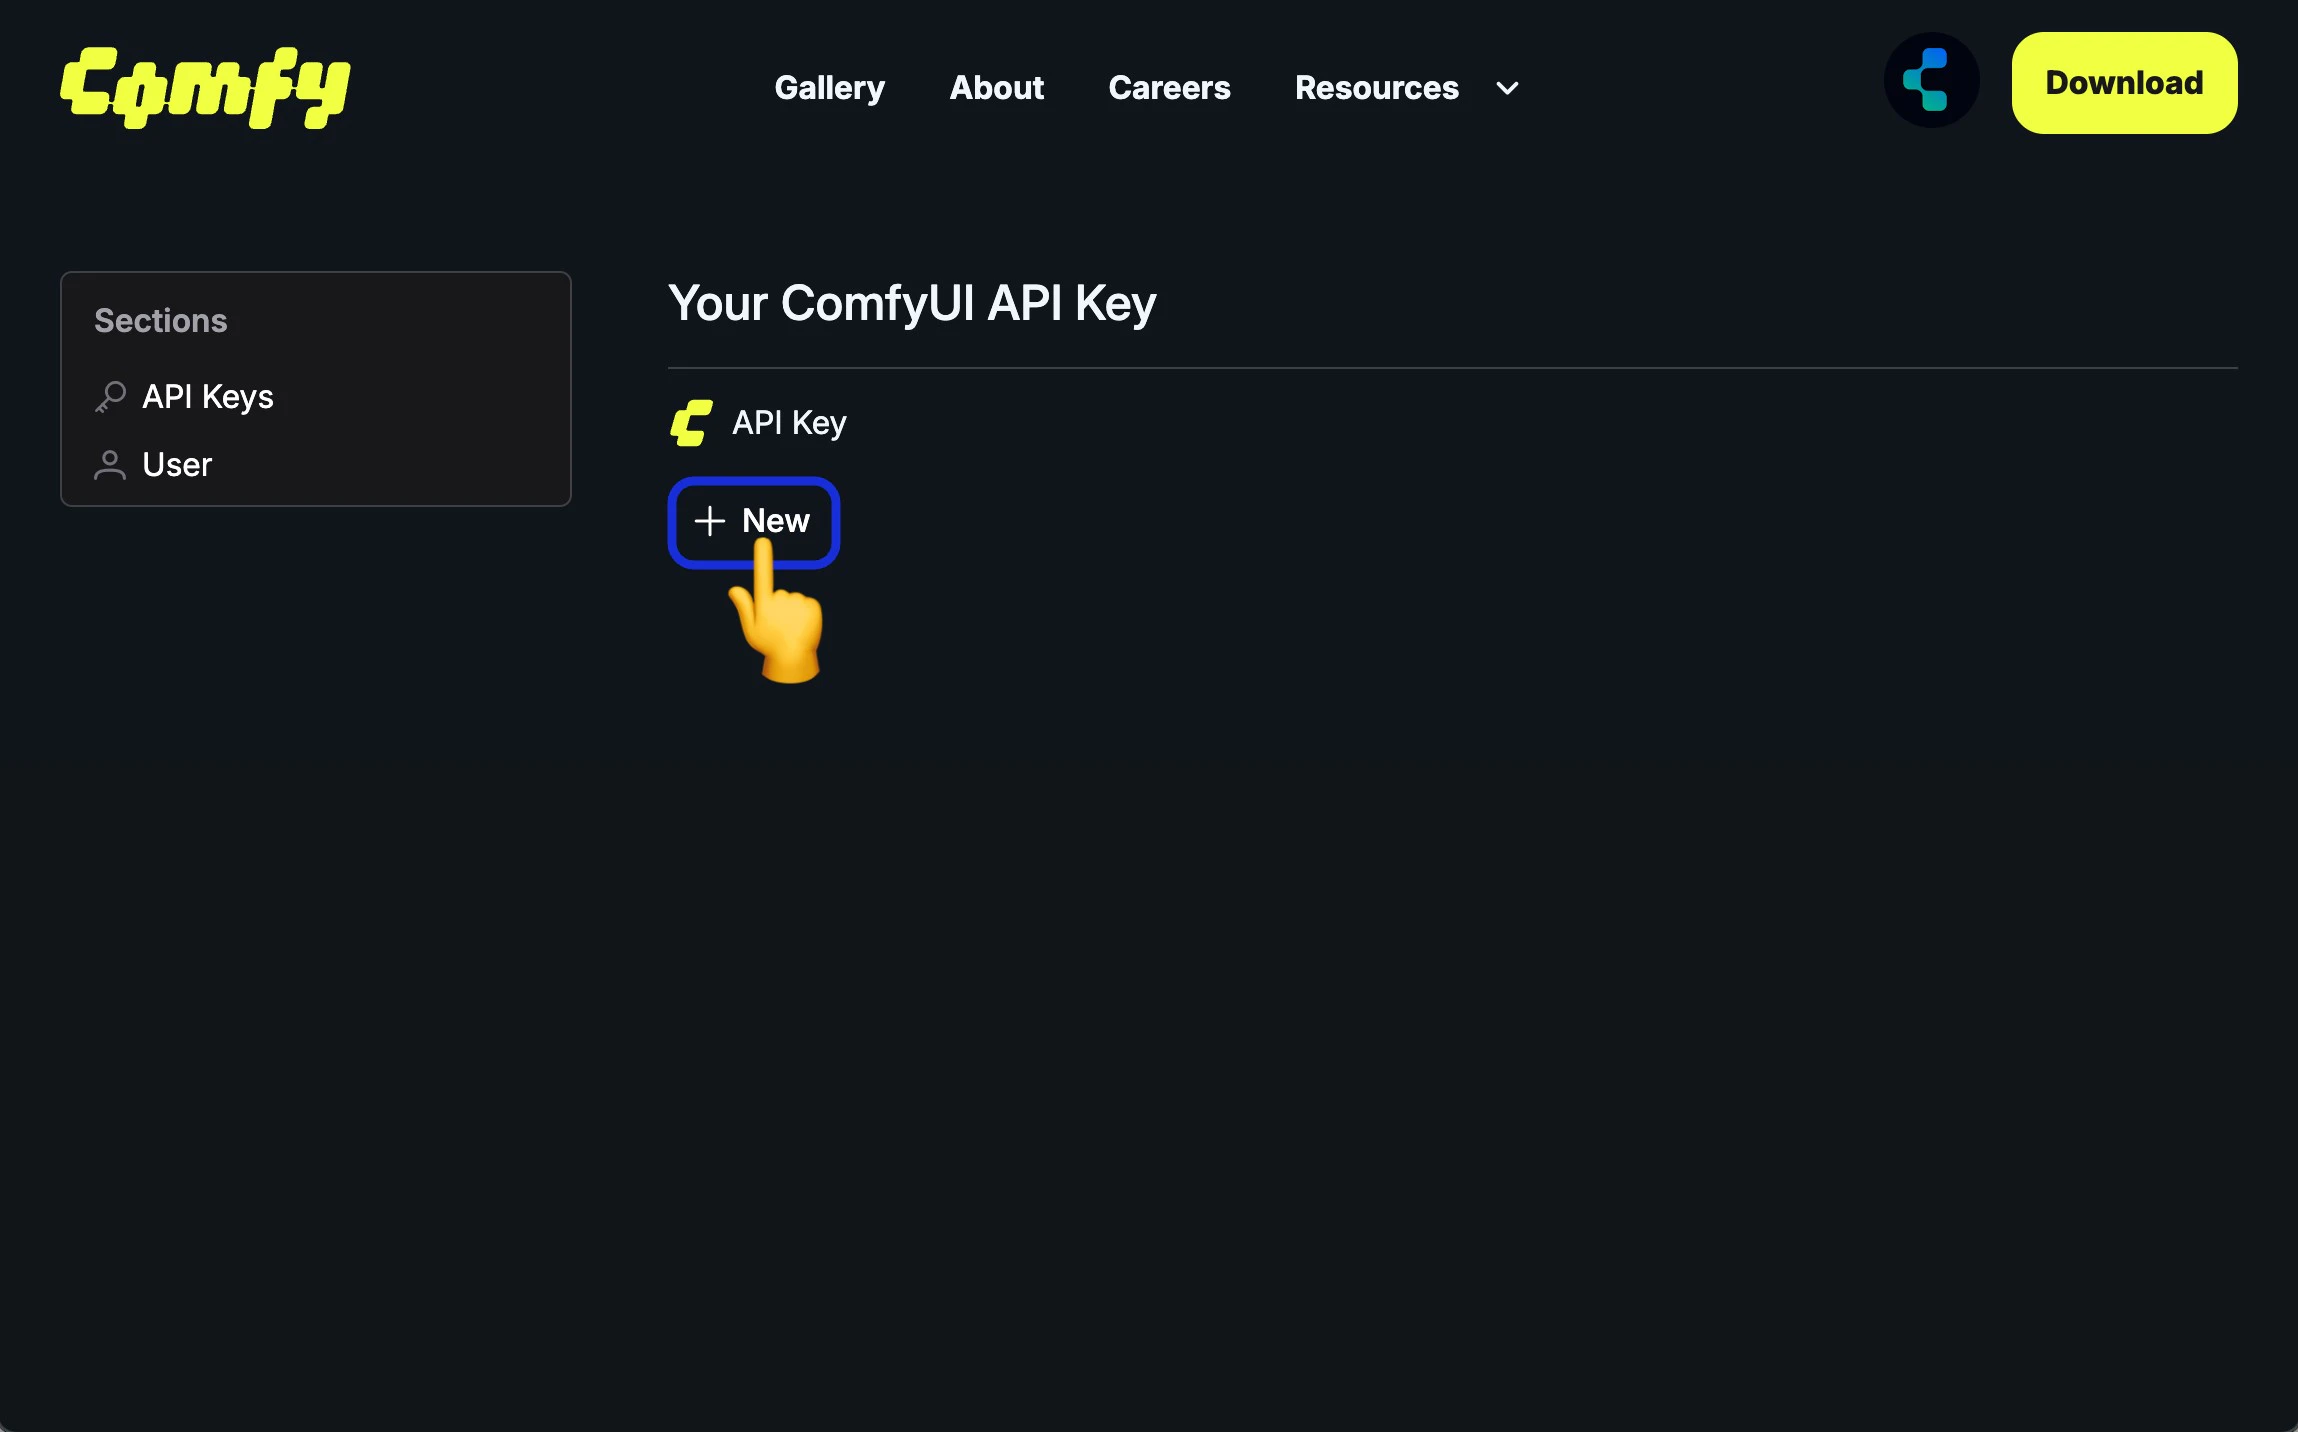
 在 API Keys 点击 `+ New` 创建 API Key
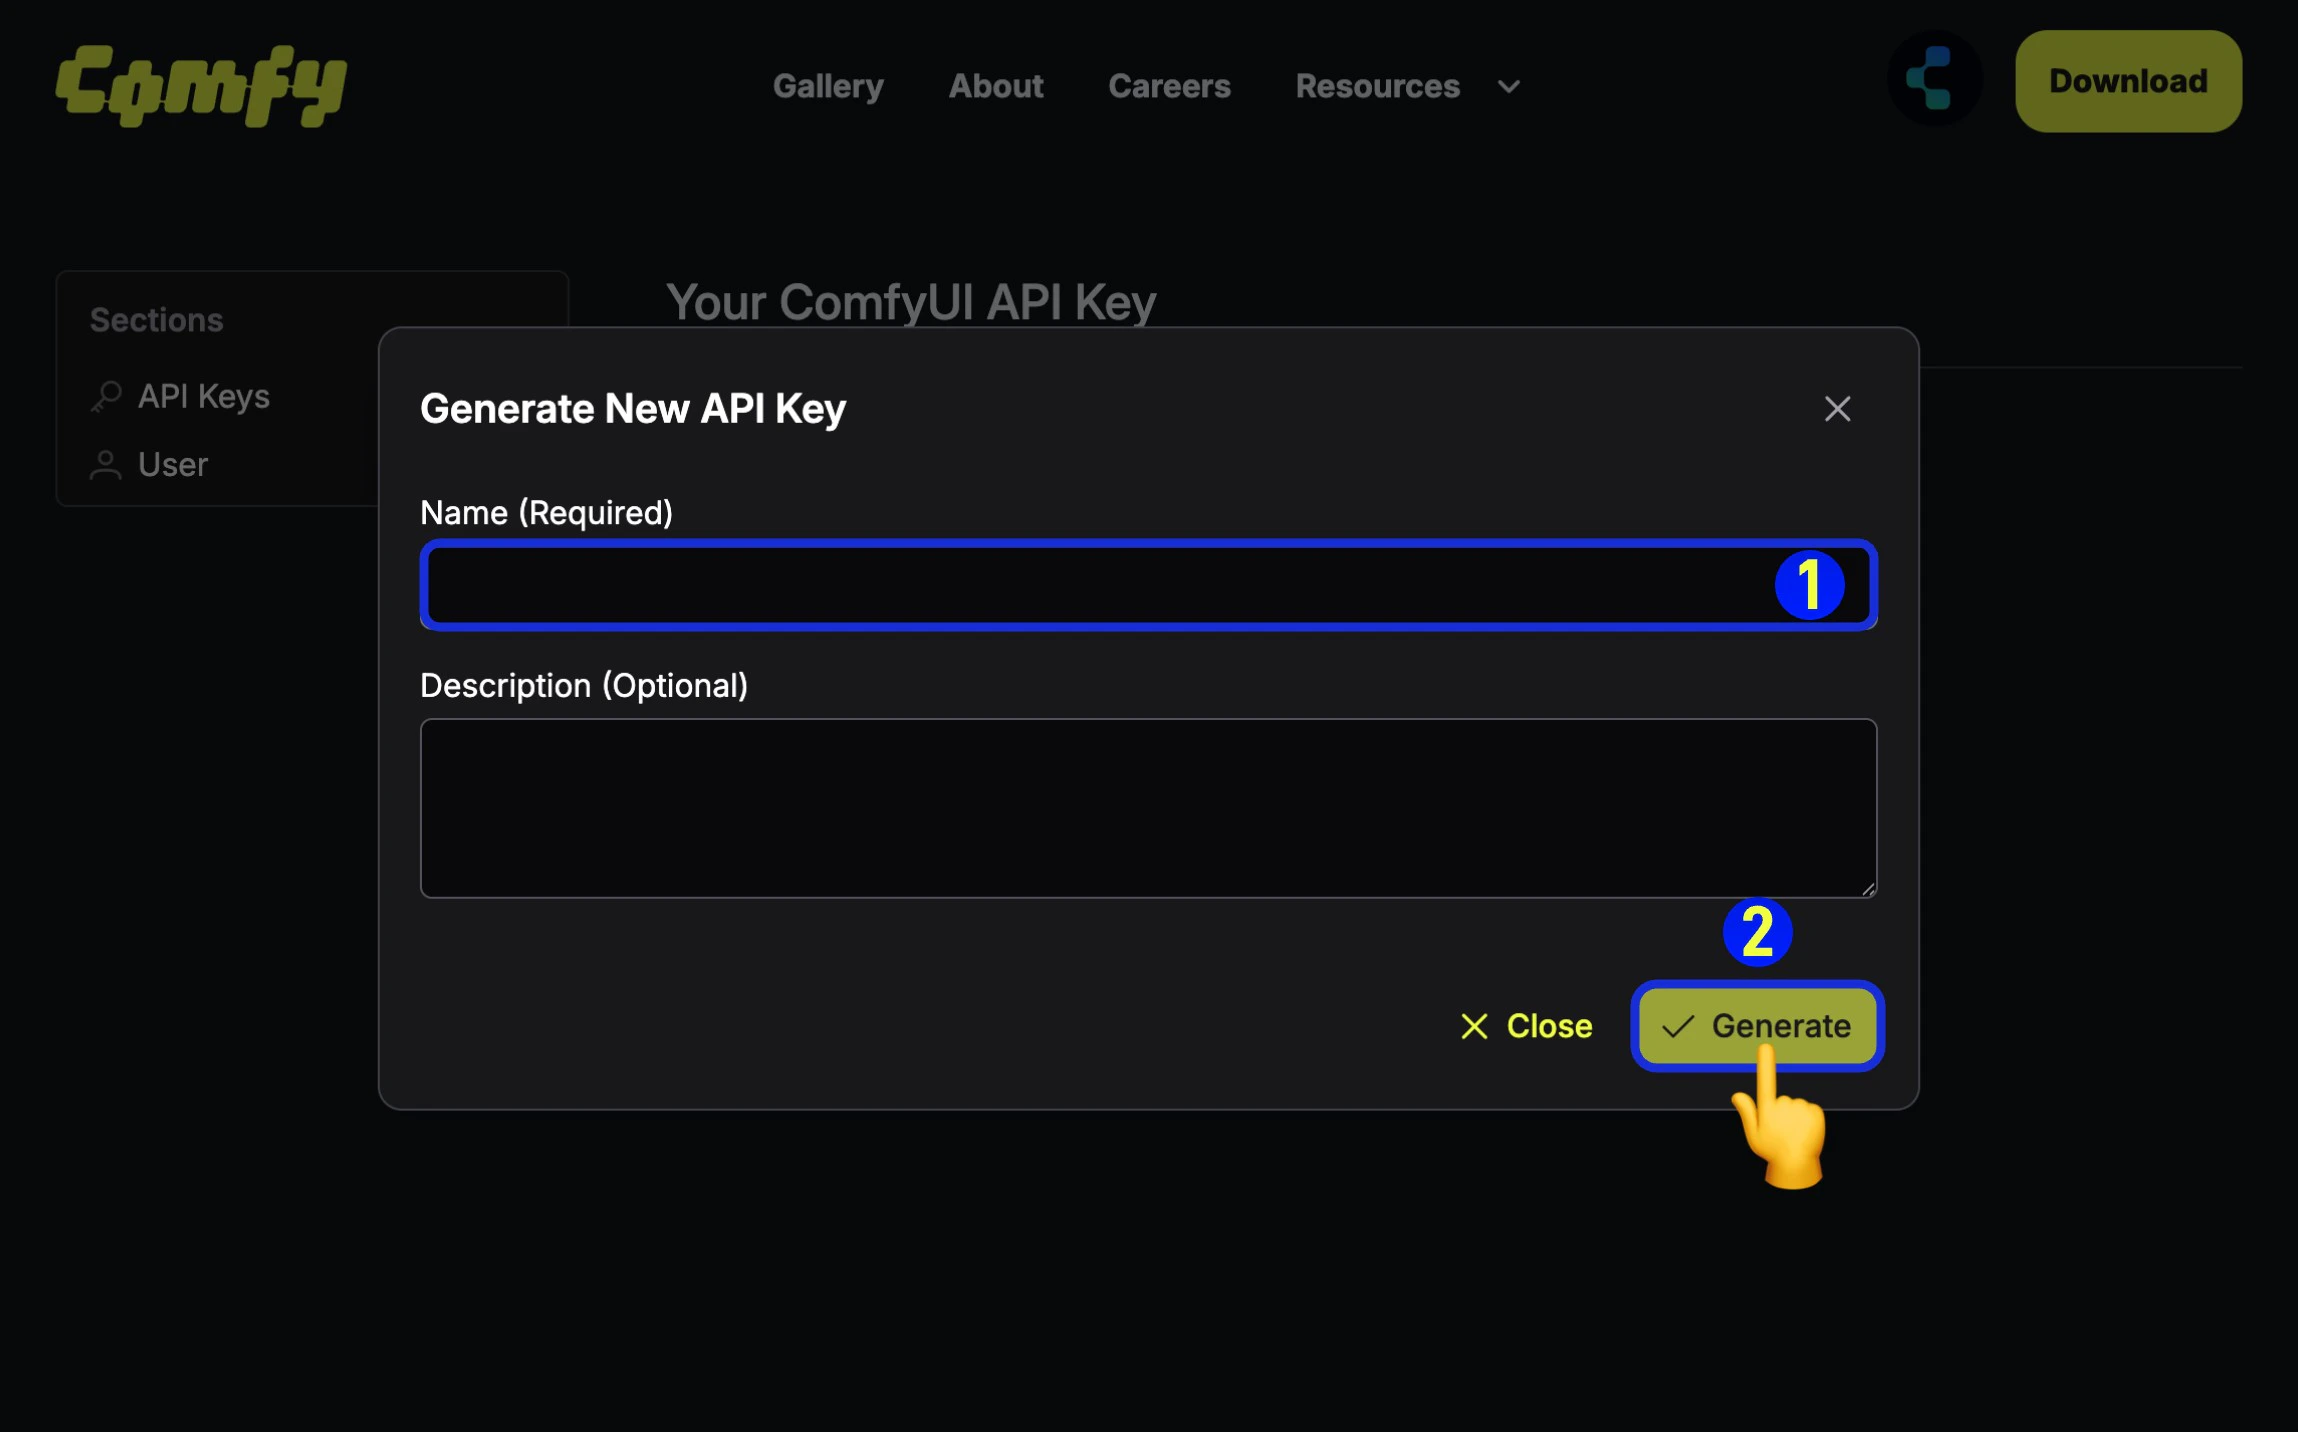 1. (必填)输入 API Key 名称,
2. 点击 `Generate` 创建
1. (必填)输入 API Key 名称,
2. 点击 `Generate` 创建
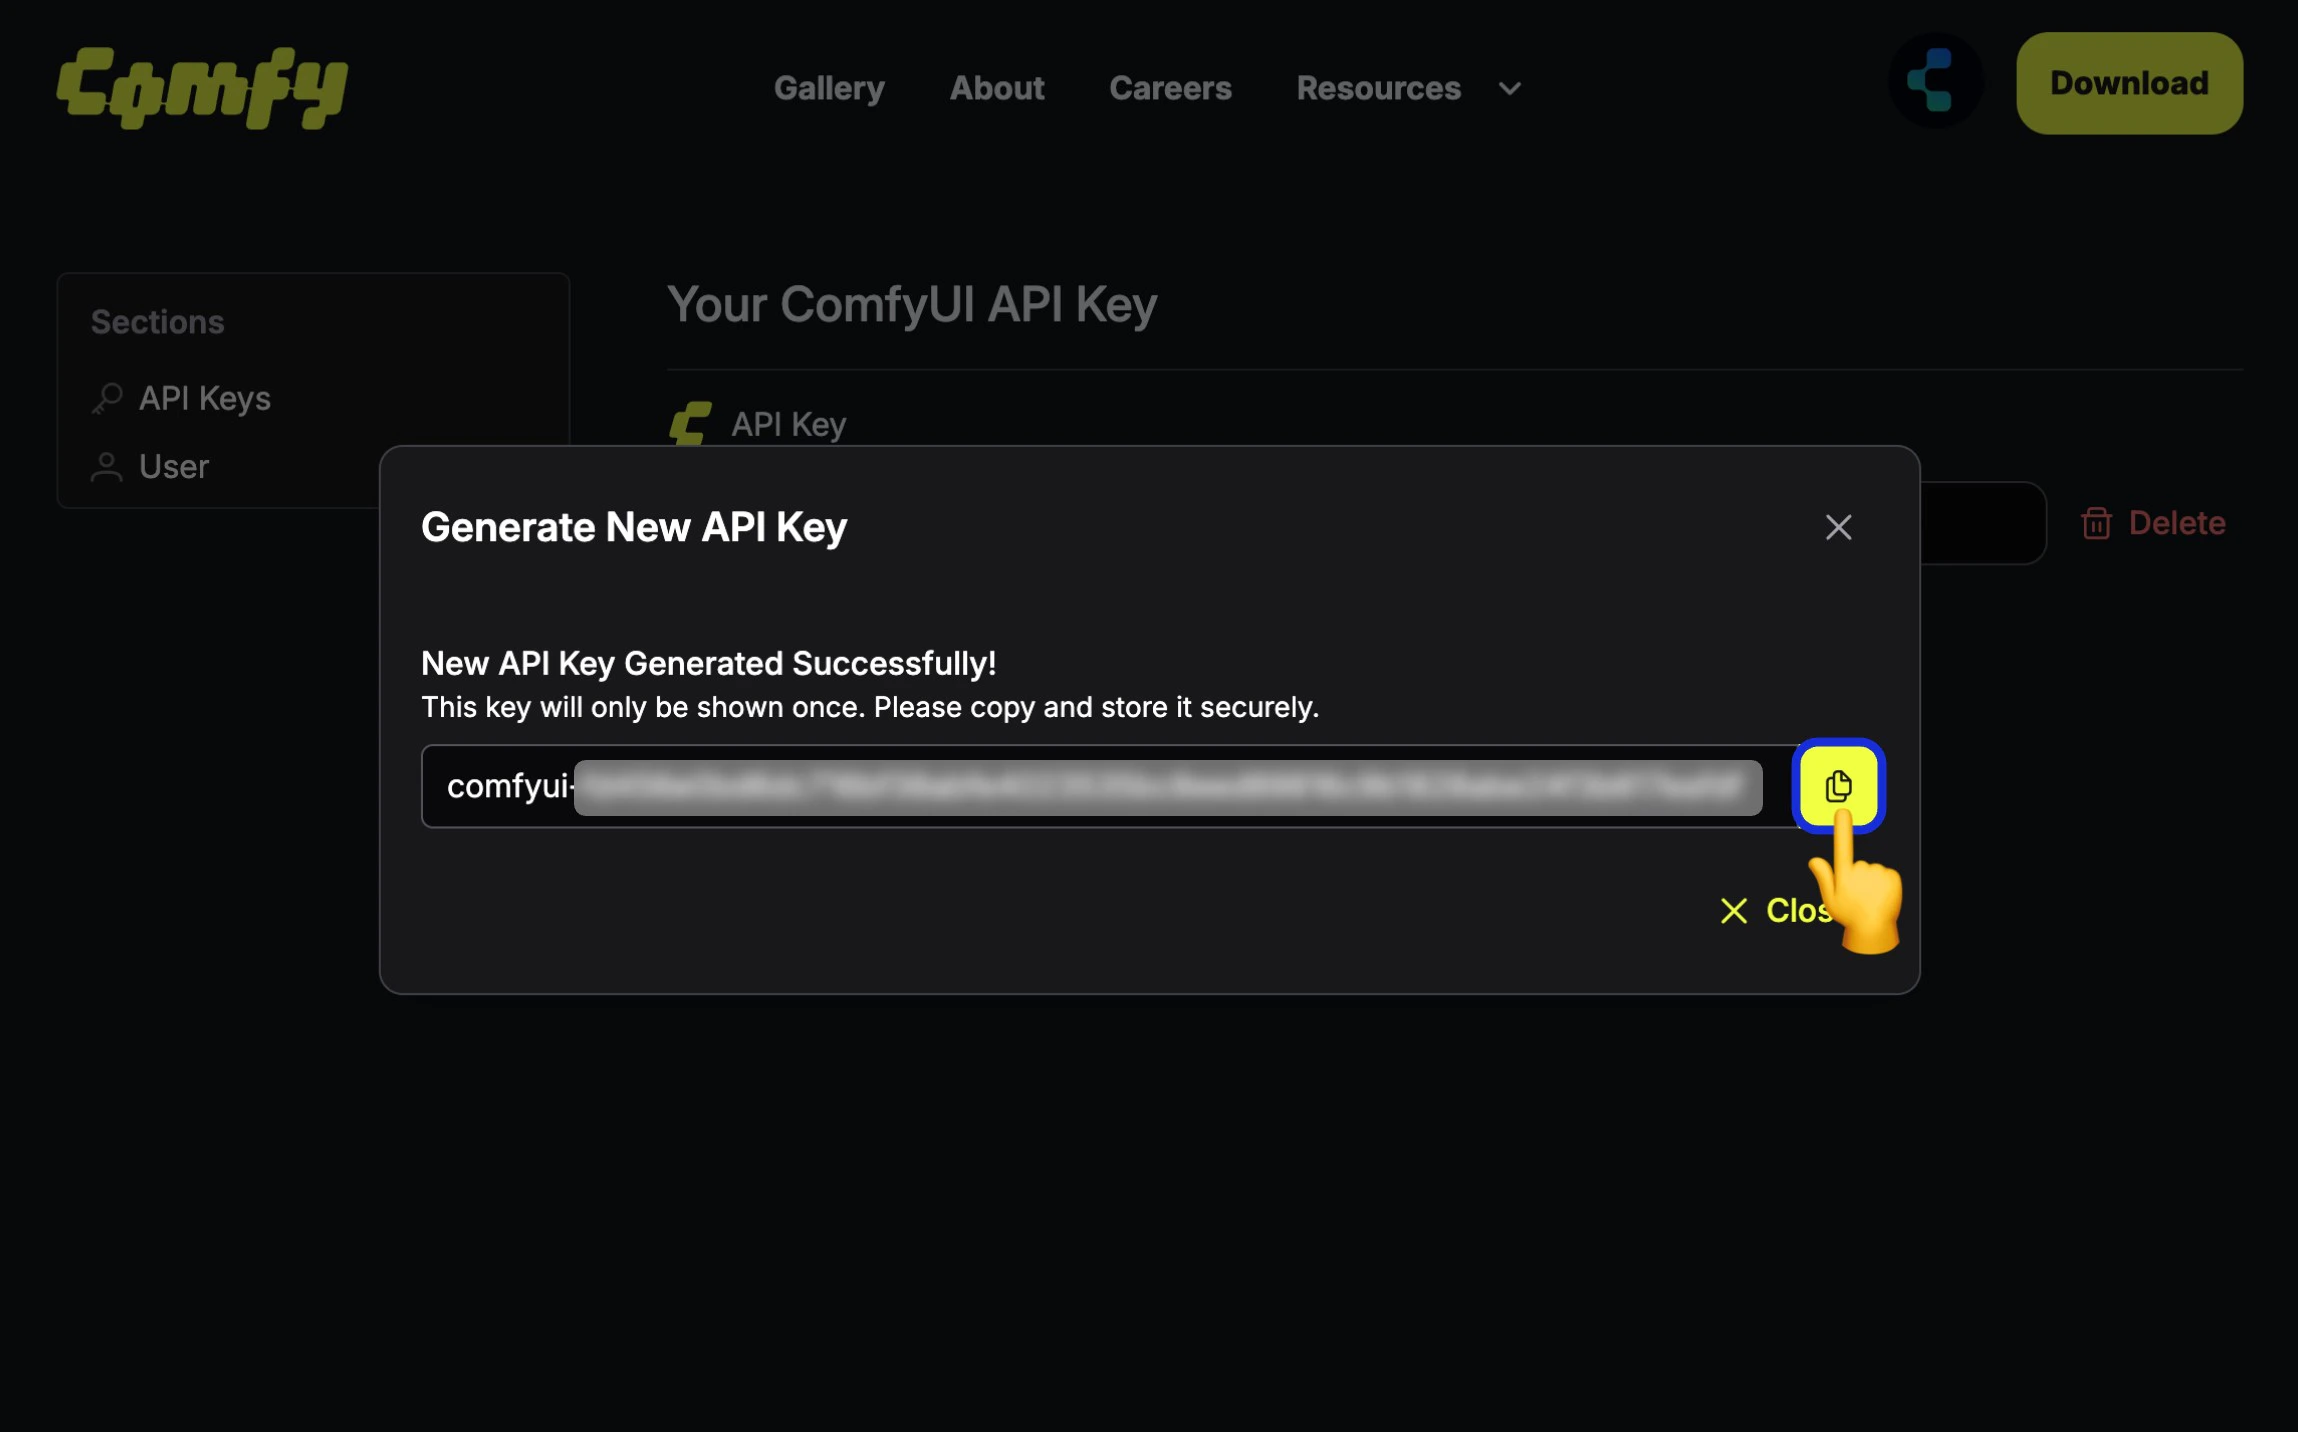 由于 API Key 仅在第一次创建时可见,所以请在创建后立即保存,后续无法查看,请妥善保存,请注意不要公开分享你的 API Key,如果对应的 Key 已经泄露,请及时删除并创建新的 API Key。
请妥善保管您的 API 密钥。切勿将其提交到版本控制系统或公开分享。
### 使用 API 密钥
在每个请求中通过 `X-API-Key` 请求头传递您的 API 密钥:
```bash curl theme={null}
curl -X GET "https://cloud.comfy.org/api/user" \
-H "X-API-Key: $COMFY_CLOUD_API_KEY"
```
```typescript TypeScript theme={null}
const API_KEY = process.env.COMFY_CLOUD_API_KEY!;
const response = await fetch("https://cloud.comfy.org/api/user", {
headers: { "X-API-Key": API_KEY },
});
const user = await response.json();
```
```python Python theme={null}
import os
import requests
API_KEY = os.environ["COMFY_CLOUD_API_KEY"]
headers = {"X-API-Key": API_KEY}
response = requests.get(
"https://cloud.comfy.org/api/user",
headers=headers
)
```
## 核心概念
### 工作流
ComfyUI 工作流是描述节点图的 JSON 对象。API 接受"API 格式"的工作流(以节点 ID 为键,包含 class\_type、inputs 等),该格式由 ComfyUI 前端的"Save (API Format)"选项导出。
### 任务
当您提交工作流时,会创建一个**任务**。任务以异步方式执行:
1. 通过 `POST /api/prompt` 提交工作流
2. 收到 `prompt_id`(任务 ID)
3. 通过 WebSocket 监控进度或轮询状态
4. 完成后获取输出
### 并行执行(并发任务)
API 用户可以同时提交多个工作流,无需等待之前的任务完成。只需发送多个 `POST /api/prompt` 请求即可——不需要特殊的请求头或参数。调度器会根据您的订阅等级限制并行运行任务。
| 订阅等级 | 并发任务数 |
| -------- | ----- |
| Free | 1 |
| Standard | 1 |
| Creator | 3 |
| Pro | 5 |
超出并发限制的任务将正常排队,并在有空闲槽位时自动执行。
并行执行目前仅通过 API 提供。请查看[定价方案](https://www.comfy.org/cloud/pricing?utm_source=docs\&utm_campaign=cloud-api)了解订阅详情。
#### 示例:并行提交多个任务
```python Python theme={null}
import os
import json
import asyncio
import aiohttp
BASE_URL = "https://cloud.comfy.org"
API_KEY = os.environ["COMFY_CLOUD_API_KEY"]
async def submit_workflow(session, workflow):
"""提交单个工作流并返回 prompt_id。"""
async with session.post(
f"{BASE_URL}/api/prompt",
headers={"X-API-Key": API_KEY, "Content-Type": "application/json"},
json={"prompt": workflow},
) as response:
result = await response.json()
return result["prompt_id"]
async def main():
with open("workflow_api.json") as f:
base_workflow = json.load(f)
# 通过更改种子创建变体
workflows = []
for seed in [42, 123, 456]:
workflow = json.loads(json.dumps(base_workflow))
workflow["3"]["inputs"]["seed"] = seed
workflows.append(workflow)
# 并发提交所有工作流
async with aiohttp.ClientSession() as session:
prompt_ids = await asyncio.gather(
*[submit_workflow(session, wf) for wf in workflows]
)
for pid in prompt_ids:
print(f"Job submitted: {pid}")
# 使用轮询或 WebSocket 监控每个任务...
asyncio.run(main())
```
```typescript TypeScript theme={null}
const BASE_URL = "https://cloud.comfy.org";
const API_KEY = process.env.COMFY_CLOUD_API_KEY!;
async function submitWorkflow(
workflow: Record
): Promise {
const response = await fetch(`${BASE_URL}/api/prompt`, {
method: "POST",
headers: { "X-API-Key": API_KEY, "Content-Type": "application/json" },
body: JSON.stringify({ prompt: workflow }),
});
if (!response.ok) throw new Error(`HTTP ${response.status}`);
return (await response.json()).prompt_id;
}
async function main() {
const base = JSON.parse(
await Deno.readTextFile("workflow_api.json")
);
// 通过更改种子创建变体
const seeds = [42, 123, 456];
const workflows = seeds.map((seed) => {
const wf = structuredClone(base);
wf["3"].inputs.seed = seed;
return wf;
});
// 并发提交所有工作流
const promptIds = await Promise.all(
workflows.map((wf) => submitWorkflow(wf))
);
for (const pid of promptIds) {
console.log(`Job submitted: ${pid}`);
}
// 使用轮询或 WebSocket 监控每个任务...
}
main();
```
### 输出
生成的内容(图像、视频、音频)存储在云存储中。输出文件可通过 `/api/view` 端点下载,该端点会返回 302 重定向到临时签名 URL。
## 快速入门
以下是完整示例,展示如何提交工作流、监控进度并获取输出:
### 步骤 1:提交工作流
```bash curl theme={null}
curl -X POST "https://cloud.comfy.org/api/prompt" \
-H "X-API-Key: $COMFY_CLOUD_API_KEY" \
-H "Content-Type: application/json" \
-d '{"prompt": '"$(cat workflow_api.json)"'}'
```
```typescript TypeScript theme={null}
const BASE_URL = "https://cloud.comfy.org";
const API_KEY = process.env.COMFY_CLOUD_API_KEY!;
// 加载您的工作流(从 ComfyUI 以 API 格式导出)
const workflow = JSON.parse(await Deno.readTextFile("workflow_api.json"));
// 提交工作流
const response = await fetch(`${BASE_URL}/api/prompt`, {
method: "POST",
headers: { "X-API-Key": API_KEY, "Content-Type": "application/json" },
body: JSON.stringify({ prompt: workflow }),
});
const result = await response.json();
const promptId = result.prompt_id;
console.log(`Job submitted: ${promptId}`);
```
```python Python theme={null}
import os
import requests
import json
BASE_URL = "https://cloud.comfy.org"
API_KEY = os.environ["COMFY_CLOUD_API_KEY"]
def get_headers():
return {"X-API-Key": API_KEY, "Content-Type": "application/json"}
# 加载您的工作流(从 ComfyUI 以 API 格式导出)
with open("workflow_api.json") as f:
workflow = json.load(f)
# 提交工作流
response = requests.post(
f"{BASE_URL}/api/prompt",
headers=get_headers(),
json={"prompt": workflow}
)
result = response.json()
prompt_id = result["prompt_id"]
print(f"Job submitted: {prompt_id}")
```
### 步骤 2:监控任务进度
您可以使用轮询或 WebSocket 来监控任务完成情况,以便获取实时更新。
#### 选项 A:轮询(简单)
**任务状态值:**
API 返回以下状态值之一:
| 状态 | 描述 |
| ------------- | ---------- |
| `pending` | 任务已排队,等待开始 |
| `in_progress` | 任务正在执行 |
| `completed` | 任务成功完成 |
| `failed` | 任务遇到错误 |
| `cancelled` | 任务被用户取消 |
```bash curl theme={null}
# 轮询任务完成状态
curl -X GET "$BASE_URL/api/job/{prompt_id}/status" \
-H "X-API-Key: $COMFY_CLOUD_API_KEY"
# 响应示例:
# {"status": "pending"} - 任务已排队
# {"status": "in_progress"} - 任务正在运行
# {"status": "completed"} - 任务成功完成
# {"status": "failed"} - 任务遇到错误
# {"status": "cancelled"} - 任务被取消
```
```typescript TypeScript theme={null}
interface JobStatus {
status: string;
}
async function getJobStatus(promptId: string): Promise {
const response = await fetch(`${BASE_URL}/api/job/${promptId}/status`, {
headers: getHeaders(),
});
if (!response.ok) throw new Error(`HTTP ${response.status}`);
return response.json();
}
async function pollForCompletion(
promptId: string,
timeout: number = 300,
pollInterval: number = 2000
): Promise {
const startTime = Date.now();
while (Date.now() - startTime < timeout * 1000) {
const { status } = await getJobStatus(promptId);
if (status === "completed") {
return;
} else if (["failed", "cancelled"].includes(status)) {
throw new Error(`任务失败,状态:${status}`);
}
await new Promise((resolve) => setTimeout(resolve, pollInterval));
}
throw new Error(`任务 ${promptId} 在 ${timeout}s 内未完成`);
}
await pollForCompletion(promptId);
console.log("任务已完成!");
```
```python Python theme={null}
def get_job_status(prompt_id: str) -> str:
"""获取任务的当前状态。"""
response = requests.get(
f"{BASE_URL}/api/job/{prompt_id}/status",
headers=get_headers()
)
response.raise_for_status()
return response.json()["status"]
def poll_for_completion(prompt_id: str, timeout: int = 300, poll_interval: float = 2.0) -> None:
"""轮询直到任务完成或超时。"""
start_time = time.time()
while time.time() - start_time < timeout:
status = get_job_status(prompt_id)
if status == "completed":
return
elif status in ("failed", "cancelled"):
raise RuntimeError(f"任务失败,状态:{status}")
time.sleep(poll_interval)
raise TimeoutError(f"任务 {prompt_id} 在 {timeout}s 内未完成")
poll_for_completion(prompt_id)
print("任务已完成!")
```
#### 选项 B:WebSocket(实时进度)
用于实时进度更新并收集输出元数据:
```typescript TypeScript theme={null}
async function listenForCompletion(
promptId: string,
timeout: number = 300000
): Promise> {
const wsUrl = `wss://cloud.comfy.org/ws?clientId=${crypto.randomUUID()}&token=${API_KEY}`;
const outputs: Record = {};
return new Promise((resolve, reject) => {
const ws = new WebSocket(wsUrl);
const timer = setTimeout(() => {
ws.close();
reject(new Error(`任务在 ${timeout / 1000}s 内未完成`));
}, timeout);
ws.onmessage = (event) => {
const data = JSON.parse(event.data);
const msgType = data.type;
const msgData = data.data ?? {};
// 过滤我们的任务
if (msgData.prompt_id !== promptId) return;
if (msgType === "executing") {
const node = msgData.node;
if (node) {
console.log(`正在执行节点:${node}`);
} else {
console.log("执行完成");
}
} else if (msgType === "progress") {
console.log(`进度:${msgData.value}/${msgData.max}`);
} else if (msgType === "executed" && msgData.output) {
outputs[msgData.node] = msgData.output;
} else if (msgType === "execution_success") {
console.log("任务成功完成!");
clearTimeout(timer);
ws.close();
resolve(outputs);
} else if (msgType === "execution_error") {
const errorMsg = msgData.exception_message ?? "未知错误";
clearTimeout(timer);
ws.close();
reject(new Error(`执行错误:${errorMsg}`));
}
};
ws.onerror = (err) => {
clearTimeout(timer);
reject(err);
};
});
}
// 等待完成并收集输出
const outputs = await listenForCompletion(promptId);
```
```python Python theme={null}
import asyncio
import aiohttp
import json
import uuid
async def listen_for_completion(prompt_id: str, timeout: float = 300.0) -> dict:
"""连接到 WebSocket 并监听任务完成。
Returns:
任务的最终输出
"""
ws_url = BASE_URL.replace("https://", "wss://")
client_id = str(uuid.uuid4())
ws_url = f"{ws_url}/ws?clientId={client_id}&token={API_KEY}"
outputs = {}
async with aiohttp.ClientSession() as session:
async with session.ws_connect(ws_url) as ws:
async def receive_messages():
async for msg in ws:
if msg.type == aiohttp.WSMsgType.TEXT:
data = json.loads(msg.data)
msg_type = data.get("type")
msg_data = data.get("data", {})
# 过滤我们的任务
if msg_data.get("prompt_id") != prompt_id:
continue
if msg_type == "executing":
node = msg_data.get("node")
if node:
print(f"正在执行节点:{node}")
elif msg_type == "progress":
value = msg_data.get("value", 0)
max_val = msg_data.get("max", 100)
print(f"进度:{value}/{max_val}")
elif msg_type == "executed":
node_id = msg_data.get("node")
output = msg_data.get("output", {})
if output:
outputs[node_id] = output
elif msg_type == "execution_success":
print("任务成功完成!")
return outputs
elif msg_type == "execution_error":
error_msg = msg_data.get("exception_message", "未知错误")
raise RuntimeError(f"执行错误:{error_msg}")
elif msg.type == aiohttp.WSMsgType.ERROR:
raise RuntimeError(f"WebSocket 错误:{ws.exception()}")
try:
return await asyncio.wait_for(receive_messages(), timeout=timeout)
except asyncio.TimeoutError:
raise TimeoutError(f"任务在 {timeout}s 内未完成")
# 等待完成并收集输出
outputs = await listen_for_completion(prompt_id)
```
详细的消息类型和二进制预览图像处理请参阅 [WebSocket 参考](/zh/development/cloud/api-reference#实时进度-websocket)。
### 步骤 3:下载输出
任务完成后,下载生成的文件。从 WebSocket 返回的 `outputs` 对象(或通过历史端点获取)包含按节点 ID 组织的输出数据。每个节点的输出可能包含 `images`、`video` 或 `audio` 数组,其中包含文件元数据。
**输出结构示例:**
```json theme={null}
{
"9": {
"images": [
{
"filename": "ComfyUI_00001_.png",
"subfolder": "",
"type": "output"
}
]
}
}
```
节点 ID(此例中的 `"9"`)对应于工作流中的 SaveImage 或其他输出节点。您可以通过打开工作流 JSON 文件并查找 `class_type` 为 `SaveImage`、`VHS_VideoCombine` 等的节点来找到这些 ID。
```bash curl theme={null}
# 下载单个输出文件(使用 -L 跟随 302 重定向)
curl -L "$BASE_URL/api/view?filename=output.png&subfolder=&type=output" \
-H "X-API-Key: $COMFY_CLOUD_API_KEY" \
-o output.png
```
```typescript TypeScript theme={null}
async function downloadOutput(
filename: string,
subfolder: string = "",
outputType: string = "output"
): Promise {
const params = new URLSearchParams({ filename, subfolder, type: outputType });
// 获取重定向 URL
const response = await fetch(`${BASE_URL}/api/view?${params}`, {
headers: { "X-API-Key": API_KEY },
redirect: "manual",
});
if (response.status !== 302) throw new Error(`HTTP ${response.status}`);
const signedUrl = response.headers.get("location")!;
// 从签名 URL 获取文件
const fileResponse = await fetch(signedUrl);
if (!fileResponse.ok) throw new Error(`HTTP ${fileResponse.status}`);
return fileResponse.arrayBuffer();
}
async function saveOutputs(
outputs: Record,
outputDir: string = "."
): Promise {
for (const nodeOutputs of Object.values(outputs)) {
for (const key of ["images", "video", "audio"]) {
for (const fileInfo of (nodeOutputs as any)[key] ?? []) {
const data = await downloadOutput(
fileInfo.filename,
fileInfo.subfolder ?? "",
fileInfo.type ?? "output"
);
const path = `${outputDir}/${fileInfo.filename}`;
await writeFile(path, Buffer.from(data));
console.log(`已保存:${path}`);
}
}
}
}
// 下载所有输出
await saveOutputs(outputs, "./my_outputs");
```
```python Python theme={null}
def download_output(filename: str, subfolder: str = "", output_type: str = "output") -> bytes:
"""下载输出文件。
Args:
filename: 文件名
subfolder: 子文件夹路径(通常为空)
output_type: "output" 表示最终输出,"temp" 表示预览
Returns:
文件字节
"""
params = {
"filename": filename,
"subfolder": subfolder,
"type": output_type
}
response = requests.get(
f"{BASE_URL}/api/view",
headers=get_headers(),
params=params
)
response.raise_for_status()
return response.content
def save_outputs(outputs: dict, output_dir: str = "."):
"""将任务的所有输出保存到磁盘。
Args:
outputs: 任务的输出字典(node_id -> output_data)
output_dir: 保存文件的目录
"""
import os
os.makedirs(output_dir, exist_ok=True)
for node_id, node_outputs in outputs.items():
for key in ("images", "video", "audio"):
for file_info in node_outputs.get(key, []):
filename = file_info["filename"]
subfolder = file_info.get("subfolder", "")
output_type = file_info.get("type", "output")
data = download_output(filename, subfolder, output_type)
output_path = os.path.join(output_dir, filename)
with open(output_path, "wb") as f:
f.write(data)
print(f"已保存:{output_path}")
# 下载所有输出
save_outputs(outputs, "./my_outputs")
```
`/api/view` 端点返回 302 重定向到临时签名 URL。您的 HTTP 客户端必须跟随重定向才能下载文件。
### 完整示例
以下是结合所有三个步骤的完整端到端示例:
```typescript TypeScript theme={null}
import { readFile, writeFile } from "fs/promises";
const BASE_URL = "https://cloud.comfy.org";
const API_KEY = process.env.COMFY_CLOUD_API_KEY!;
async function main() {
// 1. 加载并修改工作流
const workflow = JSON.parse(await readFile("workflow_api.json", "utf-8"));
workflow["3"].inputs.seed = 42;
workflow["6"].inputs.text = "a beautiful sunset";
// 2. 提交工作流
const response = await fetch(`${BASE_URL}/api/prompt`, {
method: "POST",
headers: { "X-API-Key": API_KEY, "Content-Type": "application/json" },
body: JSON.stringify({ prompt: workflow }),
});
const { prompt_id } = await response.json();
console.log(`任务已提交:${prompt_id}`);
// 3. 轮询完成状态
while (true) {
const statusRes = await fetch(`${BASE_URL}/api/job/${prompt_id}/status`, {
headers: { "X-API-Key": API_KEY },
});
const { status } = await statusRes.json();
if (status === "completed") break;
if (["failed", "cancelled"].includes(status)) {
throw new Error(`任务 ${status}`);
}
await new Promise((resolve) => setTimeout(resolve, 2000));
}
// 4. 通过任务详情端点获取输出
const jobRes = await fetch(`${BASE_URL}/api/jobs/${prompt_id}`, {
headers: { "X-API-Key": API_KEY },
});
const job = await jobRes.json();
const outputs = job.outputs;
// 5. 下载输出文件
for (const nodeOutputs of Object.values(outputs)) {
for (const fileInfo of (nodeOutputs as any).images ?? []) {
const params = new URLSearchParams({
filename: fileInfo.filename,
subfolder: fileInfo.subfolder ?? "",
type: "output",
});
const viewRes = await fetch(`${BASE_URL}/api/view?${params}`, {
headers: { "X-API-Key": API_KEY },
redirect: "manual",
});
const signedUrl = viewRes.headers.get("location")!;
const fileRes = await fetch(signedUrl);
await writeFile(`./${fileInfo.filename}`, Buffer.from(await fileRes.arrayBuffer()));
console.log(`已下载:${fileInfo.filename}`);
}
}
}
main();
```
```python Python theme={null}
import os
import requests
import json
import time
BASE_URL = "https://cloud.comfy.org"
API_KEY = os.environ["COMFY_CLOUD_API_KEY"]
def main():
# 1. 加载并修改工作流
with open("workflow_api.json") as f:
workflow = json.load(f)
workflow["3"]["inputs"]["seed"] = 42
workflow["6"]["inputs"]["text"] = "a beautiful sunset"
# 2. 提交工作流
response = requests.post(
f"{BASE_URL}/api/prompt",
headers={"X-API-Key": API_KEY, "Content-Type": "application/json"},
json={"prompt": workflow}
)
prompt_id = response.json()["prompt_id"]
print(f"任务已提交:{prompt_id}")
# 3. 轮询完成状态
while True:
status_res = requests.get(
f"{BASE_URL}/api/job/{prompt_id}/status",
headers={"X-API-Key": API_KEY}
)
status = status_res.json()["status"]
if status == "completed":
break
if status in ("failed", "cancelled"):
raise RuntimeError(f"任务 {status}")
time.sleep(2)
# 4. 通过任务详情端点获取输出
job_res = requests.get(
f"{BASE_URL}/api/jobs/{prompt_id}",
headers={"X-API-Key": API_KEY}
)
job = job_res.json()
outputs = job["outputs"]
# 5. 下载输出文件
for node_outputs in outputs.values():
for file_info in node_outputs.get("images", []):
params = {
"filename": file_info["filename"],
"subfolder": file_info.get("subfolder", ""),
"type": "output"
}
view_res = requests.get(
f"{BASE_URL}/api/view",
headers={"X-API-Key": API_KEY},
params=params
)
with open(file_info["filename"], "wb") as f:
f.write(view_res.content)
print(f"已下载:{file_info['filename']}")
if __name__ == "__main__":
main()
```
## 可用端点
| 类别 | 描述 |
| --------------------------------------------------------------- | ------------ |
| [工作流](/zh/development/cloud/api-reference#运行工作流) | 提交工作流、检查状态 |
| [任务](/zh/development/cloud/api-reference#检查任务状态) | 监控任务状态和队列 |
| [输入](/zh/development/cloud/api-reference#上传输入) | 上传图像、遮罩和其他输入 |
| [输出](/zh/development/cloud/api-reference#下载输出) | 下载生成的内容 |
| [WebSocket](/zh/development/cloud/api-reference#实时进度-websocket) | 实时进度更新 |
| [对象信息](/zh/development/cloud/api-reference#对象信息) | 可用节点及其定义 |
## 后续步骤
上面的快速入门涵盖了提交工作流和获取结果的基础知识。对于更高级的用例,请参阅 [Cloud API 参考](/zh/development/cloud/api-reference):
* **[上传输入文件](/zh/development/cloud/api-reference#上传输入)** - 为需要外部输入的工作流上传图像、遮罩或其他用户提供的内容
* **[修改工作流输入](/zh/development/cloud/api-reference#修改工作流输入)** - 在提交前动态更改工作流参数,如提示词、随机种子或节点设置
* **[使用合作伙伴节点](/zh/development/cloud/api-reference#使用合作伙伴节点)** - 调用需要额外 API 密钥配置的外部 AI 服务(Flux Pro、Ideogram 等)
* **[队列管理](/zh/development/cloud/api-reference#队列管理)** - 监控队列状态、取消任务或中断正在运行的执行
* **[错误处理](/zh/development/cloud/api-reference#错误处理)** - 处理 HTTP 错误、执行失败,并了解异常类型
其他资源:
* [OpenAPI 规范](/zh/development/cloud/openapi) - 用于代码生成的机器可读 API 规范
由于 API Key 仅在第一次创建时可见,所以请在创建后立即保存,后续无法查看,请妥善保存,请注意不要公开分享你的 API Key,如果对应的 Key 已经泄露,请及时删除并创建新的 API Key。
请妥善保管您的 API 密钥。切勿将其提交到版本控制系统或公开分享。
### 使用 API 密钥
在每个请求中通过 `X-API-Key` 请求头传递您的 API 密钥:
```bash curl theme={null}
curl -X GET "https://cloud.comfy.org/api/user" \
-H "X-API-Key: $COMFY_CLOUD_API_KEY"
```
```typescript TypeScript theme={null}
const API_KEY = process.env.COMFY_CLOUD_API_KEY!;
const response = await fetch("https://cloud.comfy.org/api/user", {
headers: { "X-API-Key": API_KEY },
});
const user = await response.json();
```
```python Python theme={null}
import os
import requests
API_KEY = os.environ["COMFY_CLOUD_API_KEY"]
headers = {"X-API-Key": API_KEY}
response = requests.get(
"https://cloud.comfy.org/api/user",
headers=headers
)
```
## 核心概念
### 工作流
ComfyUI 工作流是描述节点图的 JSON 对象。API 接受"API 格式"的工作流(以节点 ID 为键,包含 class\_type、inputs 等),该格式由 ComfyUI 前端的"Save (API Format)"选项导出。
### 任务
当您提交工作流时,会创建一个**任务**。任务以异步方式执行:
1. 通过 `POST /api/prompt` 提交工作流
2. 收到 `prompt_id`(任务 ID)
3. 通过 WebSocket 监控进度或轮询状态
4. 完成后获取输出
### 并行执行(并发任务)
API 用户可以同时提交多个工作流,无需等待之前的任务完成。只需发送多个 `POST /api/prompt` 请求即可——不需要特殊的请求头或参数。调度器会根据您的订阅等级限制并行运行任务。
| 订阅等级 | 并发任务数 |
| -------- | ----- |
| Free | 1 |
| Standard | 1 |
| Creator | 3 |
| Pro | 5 |
超出并发限制的任务将正常排队,并在有空闲槽位时自动执行。
并行执行目前仅通过 API 提供。请查看[定价方案](https://www.comfy.org/cloud/pricing?utm_source=docs\&utm_campaign=cloud-api)了解订阅详情。
#### 示例:并行提交多个任务
```python Python theme={null}
import os
import json
import asyncio
import aiohttp
BASE_URL = "https://cloud.comfy.org"
API_KEY = os.environ["COMFY_CLOUD_API_KEY"]
async def submit_workflow(session, workflow):
"""提交单个工作流并返回 prompt_id。"""
async with session.post(
f"{BASE_URL}/api/prompt",
headers={"X-API-Key": API_KEY, "Content-Type": "application/json"},
json={"prompt": workflow},
) as response:
result = await response.json()
return result["prompt_id"]
async def main():
with open("workflow_api.json") as f:
base_workflow = json.load(f)
# 通过更改种子创建变体
workflows = []
for seed in [42, 123, 456]:
workflow = json.loads(json.dumps(base_workflow))
workflow["3"]["inputs"]["seed"] = seed
workflows.append(workflow)
# 并发提交所有工作流
async with aiohttp.ClientSession() as session:
prompt_ids = await asyncio.gather(
*[submit_workflow(session, wf) for wf in workflows]
)
for pid in prompt_ids:
print(f"Job submitted: {pid}")
# 使用轮询或 WebSocket 监控每个任务...
asyncio.run(main())
```
```typescript TypeScript theme={null}
const BASE_URL = "https://cloud.comfy.org";
const API_KEY = process.env.COMFY_CLOUD_API_KEY!;
async function submitWorkflow(
workflow: Record
): Promise {
const response = await fetch(`${BASE_URL}/api/prompt`, {
method: "POST",
headers: { "X-API-Key": API_KEY, "Content-Type": "application/json" },
body: JSON.stringify({ prompt: workflow }),
});
if (!response.ok) throw new Error(`HTTP ${response.status}`);
return (await response.json()).prompt_id;
}
async function main() {
const base = JSON.parse(
await Deno.readTextFile("workflow_api.json")
);
// 通过更改种子创建变体
const seeds = [42, 123, 456];
const workflows = seeds.map((seed) => {
const wf = structuredClone(base);
wf["3"].inputs.seed = seed;
return wf;
});
// 并发提交所有工作流
const promptIds = await Promise.all(
workflows.map((wf) => submitWorkflow(wf))
);
for (const pid of promptIds) {
console.log(`Job submitted: ${pid}`);
}
// 使用轮询或 WebSocket 监控每个任务...
}
main();
```
### 输出
生成的内容(图像、视频、音频)存储在云存储中。输出文件可通过 `/api/view` 端点下载,该端点会返回 302 重定向到临时签名 URL。
## 快速入门
以下是完整示例,展示如何提交工作流、监控进度并获取输出:
### 步骤 1:提交工作流
```bash curl theme={null}
curl -X POST "https://cloud.comfy.org/api/prompt" \
-H "X-API-Key: $COMFY_CLOUD_API_KEY" \
-H "Content-Type: application/json" \
-d '{"prompt": '"$(cat workflow_api.json)"'}'
```
```typescript TypeScript theme={null}
const BASE_URL = "https://cloud.comfy.org";
const API_KEY = process.env.COMFY_CLOUD_API_KEY!;
// 加载您的工作流(从 ComfyUI 以 API 格式导出)
const workflow = JSON.parse(await Deno.readTextFile("workflow_api.json"));
// 提交工作流
const response = await fetch(`${BASE_URL}/api/prompt`, {
method: "POST",
headers: { "X-API-Key": API_KEY, "Content-Type": "application/json" },
body: JSON.stringify({ prompt: workflow }),
});
const result = await response.json();
const promptId = result.prompt_id;
console.log(`Job submitted: ${promptId}`);
```
```python Python theme={null}
import os
import requests
import json
BASE_URL = "https://cloud.comfy.org"
API_KEY = os.environ["COMFY_CLOUD_API_KEY"]
def get_headers():
return {"X-API-Key": API_KEY, "Content-Type": "application/json"}
# 加载您的工作流(从 ComfyUI 以 API 格式导出)
with open("workflow_api.json") as f:
workflow = json.load(f)
# 提交工作流
response = requests.post(
f"{BASE_URL}/api/prompt",
headers=get_headers(),
json={"prompt": workflow}
)
result = response.json()
prompt_id = result["prompt_id"]
print(f"Job submitted: {prompt_id}")
```
### 步骤 2:监控任务进度
您可以使用轮询或 WebSocket 来监控任务完成情况,以便获取实时更新。
#### 选项 A:轮询(简单)
**任务状态值:**
API 返回以下状态值之一:
| 状态 | 描述 |
| ------------- | ---------- |
| `pending` | 任务已排队,等待开始 |
| `in_progress` | 任务正在执行 |
| `completed` | 任务成功完成 |
| `failed` | 任务遇到错误 |
| `cancelled` | 任务被用户取消 |
```bash curl theme={null}
# 轮询任务完成状态
curl -X GET "$BASE_URL/api/job/{prompt_id}/status" \
-H "X-API-Key: $COMFY_CLOUD_API_KEY"
# 响应示例:
# {"status": "pending"} - 任务已排队
# {"status": "in_progress"} - 任务正在运行
# {"status": "completed"} - 任务成功完成
# {"status": "failed"} - 任务遇到错误
# {"status": "cancelled"} - 任务被取消
```
```typescript TypeScript theme={null}
interface JobStatus {
status: string;
}
async function getJobStatus(promptId: string): Promise {
const response = await fetch(`${BASE_URL}/api/job/${promptId}/status`, {
headers: getHeaders(),
});
if (!response.ok) throw new Error(`HTTP ${response.status}`);
return response.json();
}
async function pollForCompletion(
promptId: string,
timeout: number = 300,
pollInterval: number = 2000
): Promise {
const startTime = Date.now();
while (Date.now() - startTime < timeout * 1000) {
const { status } = await getJobStatus(promptId);
if (status === "completed") {
return;
} else if (["failed", "cancelled"].includes(status)) {
throw new Error(`任务失败,状态:${status}`);
}
await new Promise((resolve) => setTimeout(resolve, pollInterval));
}
throw new Error(`任务 ${promptId} 在 ${timeout}s 内未完成`);
}
await pollForCompletion(promptId);
console.log("任务已完成!");
```
```python Python theme={null}
def get_job_status(prompt_id: str) -> str:
"""获取任务的当前状态。"""
response = requests.get(
f"{BASE_URL}/api/job/{prompt_id}/status",
headers=get_headers()
)
response.raise_for_status()
return response.json()["status"]
def poll_for_completion(prompt_id: str, timeout: int = 300, poll_interval: float = 2.0) -> None:
"""轮询直到任务完成或超时。"""
start_time = time.time()
while time.time() - start_time < timeout:
status = get_job_status(prompt_id)
if status == "completed":
return
elif status in ("failed", "cancelled"):
raise RuntimeError(f"任务失败,状态:{status}")
time.sleep(poll_interval)
raise TimeoutError(f"任务 {prompt_id} 在 {timeout}s 内未完成")
poll_for_completion(prompt_id)
print("任务已完成!")
```
#### 选项 B:WebSocket(实时进度)
用于实时进度更新并收集输出元数据:
```typescript TypeScript theme={null}
async function listenForCompletion(
promptId: string,
timeout: number = 300000
): Promise> {
const wsUrl = `wss://cloud.comfy.org/ws?clientId=${crypto.randomUUID()}&token=${API_KEY}`;
const outputs: Record = {};
return new Promise((resolve, reject) => {
const ws = new WebSocket(wsUrl);
const timer = setTimeout(() => {
ws.close();
reject(new Error(`任务在 ${timeout / 1000}s 内未完成`));
}, timeout);
ws.onmessage = (event) => {
const data = JSON.parse(event.data);
const msgType = data.type;
const msgData = data.data ?? {};
// 过滤我们的任务
if (msgData.prompt_id !== promptId) return;
if (msgType === "executing") {
const node = msgData.node;
if (node) {
console.log(`正在执行节点:${node}`);
} else {
console.log("执行完成");
}
} else if (msgType === "progress") {
console.log(`进度:${msgData.value}/${msgData.max}`);
} else if (msgType === "executed" && msgData.output) {
outputs[msgData.node] = msgData.output;
} else if (msgType === "execution_success") {
console.log("任务成功完成!");
clearTimeout(timer);
ws.close();
resolve(outputs);
} else if (msgType === "execution_error") {
const errorMsg = msgData.exception_message ?? "未知错误";
clearTimeout(timer);
ws.close();
reject(new Error(`执行错误:${errorMsg}`));
}
};
ws.onerror = (err) => {
clearTimeout(timer);
reject(err);
};
});
}
// 等待完成并收集输出
const outputs = await listenForCompletion(promptId);
```
```python Python theme={null}
import asyncio
import aiohttp
import json
import uuid
async def listen_for_completion(prompt_id: str, timeout: float = 300.0) -> dict:
"""连接到 WebSocket 并监听任务完成。
Returns:
任务的最终输出
"""
ws_url = BASE_URL.replace("https://", "wss://")
client_id = str(uuid.uuid4())
ws_url = f"{ws_url}/ws?clientId={client_id}&token={API_KEY}"
outputs = {}
async with aiohttp.ClientSession() as session:
async with session.ws_connect(ws_url) as ws:
async def receive_messages():
async for msg in ws:
if msg.type == aiohttp.WSMsgType.TEXT:
data = json.loads(msg.data)
msg_type = data.get("type")
msg_data = data.get("data", {})
# 过滤我们的任务
if msg_data.get("prompt_id") != prompt_id:
continue
if msg_type == "executing":
node = msg_data.get("node")
if node:
print(f"正在执行节点:{node}")
elif msg_type == "progress":
value = msg_data.get("value", 0)
max_val = msg_data.get("max", 100)
print(f"进度:{value}/{max_val}")
elif msg_type == "executed":
node_id = msg_data.get("node")
output = msg_data.get("output", {})
if output:
outputs[node_id] = output
elif msg_type == "execution_success":
print("任务成功完成!")
return outputs
elif msg_type == "execution_error":
error_msg = msg_data.get("exception_message", "未知错误")
raise RuntimeError(f"执行错误:{error_msg}")
elif msg.type == aiohttp.WSMsgType.ERROR:
raise RuntimeError(f"WebSocket 错误:{ws.exception()}")
try:
return await asyncio.wait_for(receive_messages(), timeout=timeout)
except asyncio.TimeoutError:
raise TimeoutError(f"任务在 {timeout}s 内未完成")
# 等待完成并收集输出
outputs = await listen_for_completion(prompt_id)
```
详细的消息类型和二进制预览图像处理请参阅 [WebSocket 参考](/zh/development/cloud/api-reference#实时进度-websocket)。
### 步骤 3:下载输出
任务完成后,下载生成的文件。从 WebSocket 返回的 `outputs` 对象(或通过历史端点获取)包含按节点 ID 组织的输出数据。每个节点的输出可能包含 `images`、`video` 或 `audio` 数组,其中包含文件元数据。
**输出结构示例:**
```json theme={null}
{
"9": {
"images": [
{
"filename": "ComfyUI_00001_.png",
"subfolder": "",
"type": "output"
}
]
}
}
```
节点 ID(此例中的 `"9"`)对应于工作流中的 SaveImage 或其他输出节点。您可以通过打开工作流 JSON 文件并查找 `class_type` 为 `SaveImage`、`VHS_VideoCombine` 等的节点来找到这些 ID。
```bash curl theme={null}
# 下载单个输出文件(使用 -L 跟随 302 重定向)
curl -L "$BASE_URL/api/view?filename=output.png&subfolder=&type=output" \
-H "X-API-Key: $COMFY_CLOUD_API_KEY" \
-o output.png
```
```typescript TypeScript theme={null}
async function downloadOutput(
filename: string,
subfolder: string = "",
outputType: string = "output"
): Promise {
const params = new URLSearchParams({ filename, subfolder, type: outputType });
// 获取重定向 URL
const response = await fetch(`${BASE_URL}/api/view?${params}`, {
headers: { "X-API-Key": API_KEY },
redirect: "manual",
});
if (response.status !== 302) throw new Error(`HTTP ${response.status}`);
const signedUrl = response.headers.get("location")!;
// 从签名 URL 获取文件
const fileResponse = await fetch(signedUrl);
if (!fileResponse.ok) throw new Error(`HTTP ${fileResponse.status}`);
return fileResponse.arrayBuffer();
}
async function saveOutputs(
outputs: Record,
outputDir: string = "."
): Promise {
for (const nodeOutputs of Object.values(outputs)) {
for (const key of ["images", "video", "audio"]) {
for (const fileInfo of (nodeOutputs as any)[key] ?? []) {
const data = await downloadOutput(
fileInfo.filename,
fileInfo.subfolder ?? "",
fileInfo.type ?? "output"
);
const path = `${outputDir}/${fileInfo.filename}`;
await writeFile(path, Buffer.from(data));
console.log(`已保存:${path}`);
}
}
}
}
// 下载所有输出
await saveOutputs(outputs, "./my_outputs");
```
```python Python theme={null}
def download_output(filename: str, subfolder: str = "", output_type: str = "output") -> bytes:
"""下载输出文件。
Args:
filename: 文件名
subfolder: 子文件夹路径(通常为空)
output_type: "output" 表示最终输出,"temp" 表示预览
Returns:
文件字节
"""
params = {
"filename": filename,
"subfolder": subfolder,
"type": output_type
}
response = requests.get(
f"{BASE_URL}/api/view",
headers=get_headers(),
params=params
)
response.raise_for_status()
return response.content
def save_outputs(outputs: dict, output_dir: str = "."):
"""将任务的所有输出保存到磁盘。
Args:
outputs: 任务的输出字典(node_id -> output_data)
output_dir: 保存文件的目录
"""
import os
os.makedirs(output_dir, exist_ok=True)
for node_id, node_outputs in outputs.items():
for key in ("images", "video", "audio"):
for file_info in node_outputs.get(key, []):
filename = file_info["filename"]
subfolder = file_info.get("subfolder", "")
output_type = file_info.get("type", "output")
data = download_output(filename, subfolder, output_type)
output_path = os.path.join(output_dir, filename)
with open(output_path, "wb") as f:
f.write(data)
print(f"已保存:{output_path}")
# 下载所有输出
save_outputs(outputs, "./my_outputs")
```
`/api/view` 端点返回 302 重定向到临时签名 URL。您的 HTTP 客户端必须跟随重定向才能下载文件。
### 完整示例
以下是结合所有三个步骤的完整端到端示例:
```typescript TypeScript theme={null}
import { readFile, writeFile } from "fs/promises";
const BASE_URL = "https://cloud.comfy.org";
const API_KEY = process.env.COMFY_CLOUD_API_KEY!;
async function main() {
// 1. 加载并修改工作流
const workflow = JSON.parse(await readFile("workflow_api.json", "utf-8"));
workflow["3"].inputs.seed = 42;
workflow["6"].inputs.text = "a beautiful sunset";
// 2. 提交工作流
const response = await fetch(`${BASE_URL}/api/prompt`, {
method: "POST",
headers: { "X-API-Key": API_KEY, "Content-Type": "application/json" },
body: JSON.stringify({ prompt: workflow }),
});
const { prompt_id } = await response.json();
console.log(`任务已提交:${prompt_id}`);
// 3. 轮询完成状态
while (true) {
const statusRes = await fetch(`${BASE_URL}/api/job/${prompt_id}/status`, {
headers: { "X-API-Key": API_KEY },
});
const { status } = await statusRes.json();
if (status === "completed") break;
if (["failed", "cancelled"].includes(status)) {
throw new Error(`任务 ${status}`);
}
await new Promise((resolve) => setTimeout(resolve, 2000));
}
// 4. 通过任务详情端点获取输出
const jobRes = await fetch(`${BASE_URL}/api/jobs/${prompt_id}`, {
headers: { "X-API-Key": API_KEY },
});
const job = await jobRes.json();
const outputs = job.outputs;
// 5. 下载输出文件
for (const nodeOutputs of Object.values(outputs)) {
for (const fileInfo of (nodeOutputs as any).images ?? []) {
const params = new URLSearchParams({
filename: fileInfo.filename,
subfolder: fileInfo.subfolder ?? "",
type: "output",
});
const viewRes = await fetch(`${BASE_URL}/api/view?${params}`, {
headers: { "X-API-Key": API_KEY },
redirect: "manual",
});
const signedUrl = viewRes.headers.get("location")!;
const fileRes = await fetch(signedUrl);
await writeFile(`./${fileInfo.filename}`, Buffer.from(await fileRes.arrayBuffer()));
console.log(`已下载:${fileInfo.filename}`);
}
}
}
main();
```
```python Python theme={null}
import os
import requests
import json
import time
BASE_URL = "https://cloud.comfy.org"
API_KEY = os.environ["COMFY_CLOUD_API_KEY"]
def main():
# 1. 加载并修改工作流
with open("workflow_api.json") as f:
workflow = json.load(f)
workflow["3"]["inputs"]["seed"] = 42
workflow["6"]["inputs"]["text"] = "a beautiful sunset"
# 2. 提交工作流
response = requests.post(
f"{BASE_URL}/api/prompt",
headers={"X-API-Key": API_KEY, "Content-Type": "application/json"},
json={"prompt": workflow}
)
prompt_id = response.json()["prompt_id"]
print(f"任务已提交:{prompt_id}")
# 3. 轮询完成状态
while True:
status_res = requests.get(
f"{BASE_URL}/api/job/{prompt_id}/status",
headers={"X-API-Key": API_KEY}
)
status = status_res.json()["status"]
if status == "completed":
break
if status in ("failed", "cancelled"):
raise RuntimeError(f"任务 {status}")
time.sleep(2)
# 4. 通过任务详情端点获取输出
job_res = requests.get(
f"{BASE_URL}/api/jobs/{prompt_id}",
headers={"X-API-Key": API_KEY}
)
job = job_res.json()
outputs = job["outputs"]
# 5. 下载输出文件
for node_outputs in outputs.values():
for file_info in node_outputs.get("images", []):
params = {
"filename": file_info["filename"],
"subfolder": file_info.get("subfolder", ""),
"type": "output"
}
view_res = requests.get(
f"{BASE_URL}/api/view",
headers={"X-API-Key": API_KEY},
params=params
)
with open(file_info["filename"], "wb") as f:
f.write(view_res.content)
print(f"已下载:{file_info['filename']}")
if __name__ == "__main__":
main()
```
## 可用端点
| 类别 | 描述 |
| --------------------------------------------------------------- | ------------ |
| [工作流](/zh/development/cloud/api-reference#运行工作流) | 提交工作流、检查状态 |
| [任务](/zh/development/cloud/api-reference#检查任务状态) | 监控任务状态和队列 |
| [输入](/zh/development/cloud/api-reference#上传输入) | 上传图像、遮罩和其他输入 |
| [输出](/zh/development/cloud/api-reference#下载输出) | 下载生成的内容 |
| [WebSocket](/zh/development/cloud/api-reference#实时进度-websocket) | 实时进度更新 |
| [对象信息](/zh/development/cloud/api-reference#对象信息) | 可用节点及其定义 |
## 后续步骤
上面的快速入门涵盖了提交工作流和获取结果的基础知识。对于更高级的用例,请参阅 [Cloud API 参考](/zh/development/cloud/api-reference):
* **[上传输入文件](/zh/development/cloud/api-reference#上传输入)** - 为需要外部输入的工作流上传图像、遮罩或其他用户提供的内容
* **[修改工作流输入](/zh/development/cloud/api-reference#修改工作流输入)** - 在提交前动态更改工作流参数,如提示词、随机种子或节点设置
* **[使用合作伙伴节点](/zh/development/cloud/api-reference#使用合作伙伴节点)** - 调用需要额外 API 密钥配置的外部 AI 服务(Flux Pro、Ideogram 等)
* **[队列管理](/zh/development/cloud/api-reference#队列管理)** - 监控队列状态、取消任务或中断正在运行的执行
* **[错误处理](/zh/development/cloud/api-reference#错误处理)** - 处理 HTTP 错误、执行失败,并了解异常类型
其他资源:
* [OpenAPI 规范](/zh/development/cloud/openapi) - 用于代码生成的机器可读 API 规范